
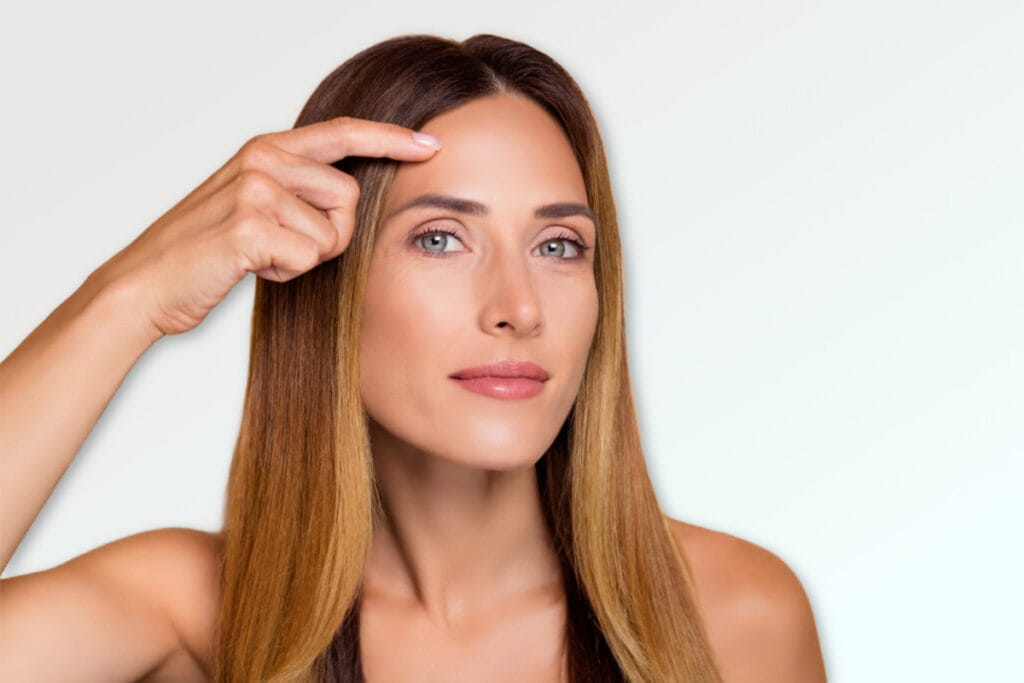
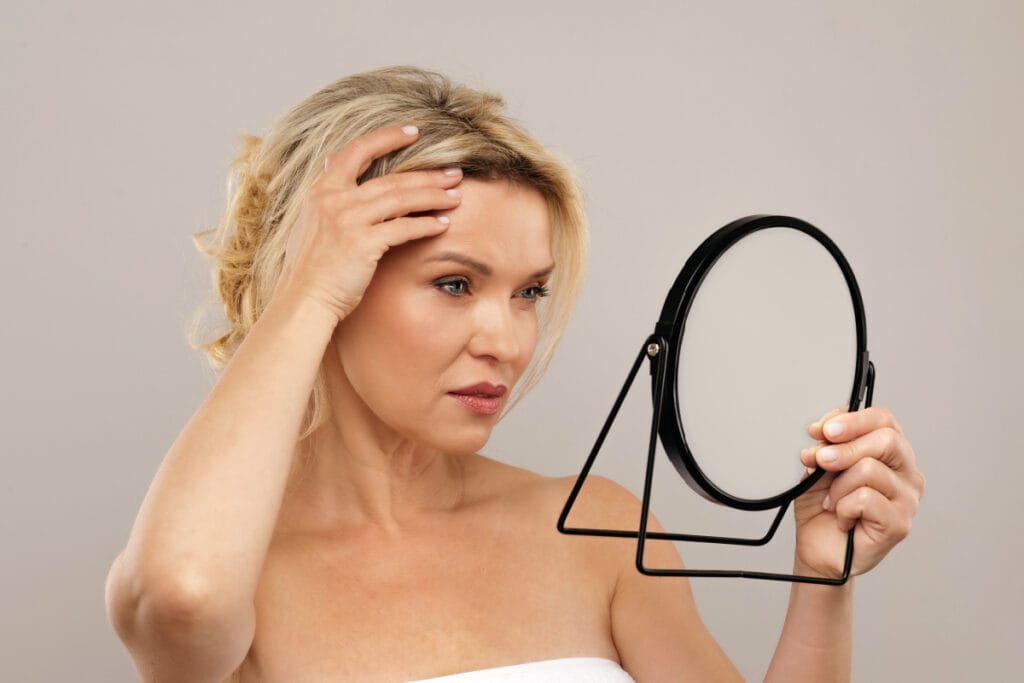
If you’ve been researching ways to address a heavy brow, forehead wrinkles, or that perpetually tired look staring back at you in the mirror, you’ve likely come across the endoscopic brow lift.
Praised as a “minimally invasive” alternative to traditional brow lift surgery, this procedure has been a staple in facial rejuvenation for over 30 years. But with so many options available—from Botox® Cosmetic to thread lifts to traditional surgery—is the endoscopic approach really worth it?
With over 20 years of experience performing facial rejuvenation procedures, Dr. Claytor has seen firsthand what the endoscopic brow lift can and cannot accomplish. Here’s an honest assessment, and how to know if it’s the right choice for you.
What Makes the Endoscopic Brow Lift Different
Traditional brow lift surgery involves a lengthy incision hidden within the hair on the scalp. While effective, this approach leaves a longer scar, carries a higher risk of scalp numbness, and requires a more extensive recovery.
The endoscopic technique, introduced in the 1990s, changed the game by using three to five small incisions (each less than an inch) hidden within the hairline. A tiny camera guides the surgeon’s instruments beneath the skin, allowing for precise tissue repositioning without the dramatic incisions of traditional methods.
Smaller incisions mean less visible scarring, reduced risk of prolonged numbness, and a faster return to normal activities for most patients.
Who Benefits Most from an Endoscopic Brow Lift?
In Dr. Claytor’s experience, the best candidates for endoscopic brow lifting share certain characteristics:
You’re a strong candidate if you:
- Have mild to moderate brow descent causing a tired, sad, or angry appearance
- Notice that your eyebrows have dropped to or below the brow bone
- Experience upper eyelid “hooding” that may be partially caused by brow position
- Have good skin elasticity and reasonable expectations
- Want the most subtle scarring possible
- Have a normal to low hairline
You may need a different approach if you:
- Have severe brow ptosis (sagging) with a significant amount of excess skin
- Have a very high forehead and want to lower your hairline
- Have very thin skin or poor skin elasticity
- Primarily want to address deep forehead rhytids (static wrinkles etched into the skin)
For patients looking for full-face rejuvenation with minimal downtime, the endoscopic brow lift can also be paired with an endoscopic “ponytail” facelift or advanced non-surgical techniques like Dr. Claytor’s LaMiNa (nanofat microneedling with laser skin resurfacing), which addresses fine lines (including those around the mouth) and creates a notably more youthful skin texture and tone.
The Awake Option: A Less-Discussed Advantage
The endoscopic brow lift can be performed under local tumescent anesthesia, which numbs the surgical site, rather than general anesthesia, which puts you to sleep for the procedure.
For appropriate candidates, this “awake” approach offers several benefits:
- Faster recovery and less grogginess
- Reduced anesthesia-related risks
- Ability to go home more quickly
- Often a lower overall cost
Not everyone is a candidate for the awake approach, but it’s worth discussing during your consultation if avoiding general anesthesia is important to you. (If you are also considering a facelift, check out our recent deep-dive into the benefits of an “awake facelift.”)
The Honest Limitations You Should Know
No procedure is perfect for everyone. Here’s what the research—and Dr. Claytor’s own extensive experience—reveals about its limitations:
Longevity debates
One of the most discussed aspects of the endoscopic technique is whether results last as long as traditional methods. The most frequently criticized and debated aspects of the technique are stabilization problems and recurrent brow ptosis (in other words, needing another surgery) in the long term. Still, advances in fixation techniques have significantly improved the longevity of endoscopic results, with most patients enjoying results that last 7-10 years or longer.
Not ideal for severe sagging
The endoscopic approach works best for mild to moderate brow descent. If you have significant drooping or very heavy brows, you may achieve better results with a traditional approach or a combination technique.
Hairline considerations
The endoscopic technique preserves your natural hairline position, which is usually a benefit. However, it is not always ideal for patients with a high hairline position. If you want to lower your hairline, a different approach may be more appropriate.
Some “settling” is normal
In the first few months after surgery, you may notice that your brows settle slightly from their immediate post-operative position. This is expected and accounted for during surgery. The final result typically becomes fully visible around the 3-6 month mark.
What About Sofwave® as a Non-Surgical Alternative?
Another option patients frequently ask about is Sofwave® skin tightening, an FDA-cleared ultrasound treatment that lifts and tightens skin without surgery or needles. Sofwave delivers precise ultrasound energy to the mid-dermis to stimulate collagen production, and it’s specifically cleared for eyebrow lifting.
Where Sofwave shines
Sofwave is completely non-invasive with zero downtime—you can return to normal activities immediately, even apply makeup the same day. It’s safe for all skin types and can be performed in about 30-45 minutes. For patients with early signs of brow descent who want a subtle lift without any recovery period, Sofwave can be an excellent starting point.
Where Sofwave falls short compared to endoscopic brow lift
While Sofwave stimulates collagen and provides gradual tightening over 3-6 months, it cannot physically reposition descended tissues the way surgery can. Results are more subtle (typically a few millimeters of lift) and temporary, lasting approximately 12-18 months before maintenance treatments are needed. For patients with moderate to significant brow ptosis, the degree of correction Sofwave provides may not be sufficient to achieve their goals.
The bottom lineSofwave is ideal for patients in their late 30s to early 50s who are noticing mild laxity and want to delay surgery, or for those who want to maintain results after a surgical brow lift. If you have noticeable brow descent that’s causing hooding over your eyes or a perpetually tired appearance, the endoscopic brow lift will deliver more dramatic, longer-lasting results. Some patients choose to start with Sofwave to “test” the concept of a lifted brow before committing to surgery, which is a perfectly reasonable approach if you have realistic expectations.
The Honest Verdict: Is It Worth the Hype?
After performing hundreds of facial rejuvenation procedures, here’s Dr. Claytor’s perspective: the endoscopic brow lift absolutely lives up to its reputation for the right patient.
The key word is “right.” This procedure delivers exceptional results when used for its intended purpose, which is correcting mild to moderate brow descent in patients who value minimal scarring and faster recovery.
Where the endoscopic brow lift truly shines is in creating natural-looking rejuvenation that doesn’t scream “I had surgery.” Patients look refreshed, more awake, and like themselves, but without the heaviness and fatigue that aging had imposed on their upper face.
If you’re considering this procedure, the most important step is an honest evaluation with a board-certified plastic surgeon who performs multiple types of brow lifts. With a trusted plastic surgeon, the goal is never to sell you on a particular technique, but to identify the approach that will give you the best possible outcome for your unique anatomy and goals.
Dr. R. Brannon Claytor is a board-certified plastic surgeon and Castle Connolly Top Doctor specializing in advanced techniques to minimize downtime and optimize patient outcomes. He operates out of a private, Quad-A accredited surgical suite in Bryn Mawr. We invite you to schedule a consultation to learn more about your options.
References
Panella NJ, Wallin JL, Goldman ND. Patient outcomes, satisfaction, and improvement in headaches after endoscopic brow-lift. JAMA Facial Plast Surg. 2013 Jul-Aug;15(4):263-7. doi: 10.1001/jamafacial.2013.924. PMID: 23699709.
Raggio BS, Winters R. Endoscopic Brow Lift. [Updated 2025 Jun 19]. In: StatPearls [Internet]. Treasure Island (FL): StatPearls Publishing; 2025 Jan-. Available from: https://www.ncbi.nlm.nih.gov/books/NBK545220/
Serhat Şibar, Asiye Uğraş Dikmen, Ayhan Işık Erdal, Long-term Stability in Endoscopic Brow Lift: A Systematic Review and Meta-Analysis of the Literature, Aesthetic Surgery Journal, Volume 45, Issue 3, March 2025, Pages 232–240, https://doi.org/10.1093/asj/sjae225
Brow lifts vs Botox: Do you need one or both?. American Society of Plastic Surgeons.
Minimally invasive brow lifting procedure
An endoscopic brow lift is an advanced, minimally invasive procedure that addresses sagging brows, forehead wrinkles, and frown lines. Unlike traditional brow lift techniques that require long incisions across the hairline, the endoscopic approach uses several small incisions hidden within the hair. Dr. Claytor uses a tiny camera (endoscope) and specialized instruments to lift and reposition the brow tissues, creating natural-looking rejuvenation with less scarring and downtime.
This technique is ideal for patients who want to address early to moderate brow descent, horizontal forehead lines, and the tired or angry appearance caused by drooping brows. The endoscopic method preserves hairline position, minimizes visible scarring, and allows for precise, customized lifting that complements your unique facial structure.
Show video transcript
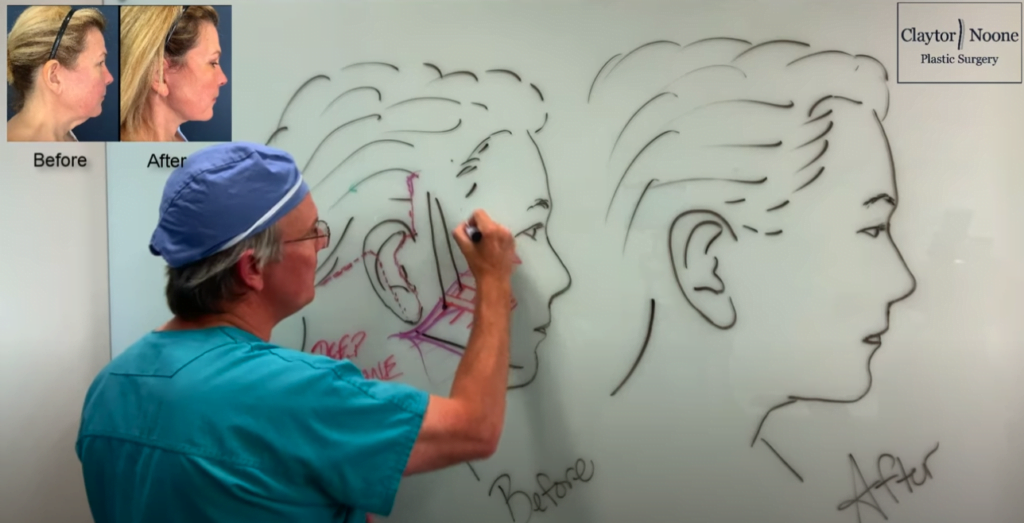
Endoscopic brow lift. What is it? How does it work? How do you do it? Patients will come in and they’ll say, “Dr. Claytor, my brow, I would like to have it lifted. How do we do this?” We mark where it is that they want it lifted. We make tiny little incisions up in the scalp so you don’t see them. Often times, we’ll make another tiny little incision here. What I do is I go in with my scope and I’m able to elevate the tissue and look around and do all the releasing. And I’m looking and releasing. This is a very very dense area of adhesion right along the lateral brow and it is essential to release that area so that you get a really really good desirable brow lift that stays for a long time. That’s one of the frustrations with a brow lift is that they drop down over time. So you’re coming in with a scope and that’s what allows you to do this very minimally invasively. In the old days we would make big incisions across here right at the hairline and I think they were just impossible to hide that scar and I think there was a lot of stigmata with that.
So after you’ve used the scope to elevate everything and release everything, now you come in with your drill. A lot of times we do this on patients who are awake, which is interesting. They really have no concept where we’re doing this because the skull region is an area that is insensate once you’re down to the skull. So they don’t feel it at all. So we engage the drill. When we turn the handle, the drill bit spins around. It does not go all the way through. It just goes through the outer cortex of the skull. And that allows us to then be able to place the endotine, which is an absorbable piece of material with these little hooks on it that we’re able to place right into the skull. We lift the brow, set it where we want it, and then we set it down on these endotines. And so it’s a little triangular shaped device that sits in there and it gives amazing fixation that stays in place until this dissolves, which is about 6 to 9 months away.
Sometimes patients can feel it and that’s why it’s important to put it up in the hairline. If you put it too far down onto the area of the scalp that does not have hair, you might see these little bumps. So, you put it up in the hairline so it’s basically invisible. And you can comb your hair and do everything else. And then there are a few little stitches that go right in the area of access. And you want to talk to the patient and say, “Where do you want your brow lifted?” Cuz some people want it lifted centrally, some people want it lifted laterally. And so you can migrate or move this when you first put it in to determine where you want to get the greatest lift.
If you wanted a lateral lift, a lot of times patients will come in and say, “I’m looking for those fox eyes.” That’s a really big concept today. So you need to go down here and release all of the lateral canthal retaining ligaments here. You want to let go all of these so that now the corner of the eye can come up. And this can be done through the brow lift incisions. It’s a fantastic technique. Sometimes patients don’t want to have that much elevation. Other times patients are looking for that. That’s why it’s so important to ask patients, what are you after? What are you looking for? What’s your interest? These are all the things that are possible with the endoscopic brow lift procedure.
As a recap, here we are with the scope. We can enter in here and this can give us visualization of all these different areas. So we can come in and be visualizing here while we come in with an instrument that we can use to do all the dissection and release all of the attachments. That’s the power of these small incisions through a scope. Endoscopic brow lift. Fantastic technique to elevate the upper third of the face. Hope you found this helpful.
Benefits of Endoscopic Brow Lift
- Minimal scarring (small incisions hidden in hairline)
- Shorter recovery time compared to traditional methods
- Natural-looking, long-lasting results
- Reduced forehead wrinkles and frown lines
- Elevated brow position for a more alert, youthful appearance
- Can be performed under local anesthesia with sedation
Who is a Good Candidate for Endoscopic Brow Lift?
You may be an ideal candidate for an endoscopic brow lift if you:
- Have mild to moderate brow descent or sagging
- Experience deep horizontal forehead wrinkles
- Notice frown lines between your eyebrows (glabellar lines)
- Feel your brows make you look tired, sad, or angry
- Have good skin elasticity and overall health
- Are a non-smoker or willing to quit before surgery
- Have realistic expectations about surgical outcomes
The endoscopic technique works best for patients with adequate bone structure and forehead height. If you have significant brow ptosis (severe drooping), a traditional or direct brow lift may be more appropriate. Dr. Claytor will evaluate your facial anatomy, skin quality, and aesthetic goals during your consultation to determine the best approach.
Patients who combine brow lift with upper blepharoplasty (eyelid surgery) often achieve the most dramatic rejuvenation of the upper face, as both procedures work synergistically to open and refresh the eye area.
Dr. Claytor uses advanced minimally invasive techniques to lift and rejuvenate the brow area, reducing forehead wrinkles and creating a refreshed, natural-looking appearance with minimal scarring and faster recovery.
What to Expect During Your Endoscopic Brow Lift
Your endoscopic brow lift is performed at Dr. Claytor’s private, accredited surgical suite in Bryn Mawr, ensuring comfort, safety, and privacy throughout your experience. The procedure typically takes 1-2 hours, depending on whether additional treatments are combined.
Anesthesia
Dr. Claytor can perform endoscopic brow lift under local anesthesia with IV sedation or general anesthesia, depending on your preference and medical history. Many patients prefer the “awake” option for faster recovery and reduced anesthesia risks.
Surgical Steps
- Incision Placement: Dr. Claytor makes 3-5 small incisions (less than one inch each) behind your hairline, strategically positioned to remain completely hidden.
- Endoscopic Visualization: A tiny camera is inserted through one incision, allowing Dr. Claytor to view the underlying tissues on a monitor with exceptional precision.
- Tissue Release & Repositioning: Using specialized instruments, he gently releases the tissues that cause frown lines and forehead wrinkles, then lifts and secures the brow in its new, elevated position.
- Fixation: The lifted tissues are secured using small dissolvable anchors or sutures, eliminating the need for visible external fixation.
- Closure: The small incisions are closed with sutures that are typically removed within 7-10 days.
The endoscopic approach allows Dr. Claytor to achieve precise, customized lifting while minimizing trauma to surrounding tissues, resulting in less swelling, bruising, and faster recovery compared to traditional techniques.

“Dr. Claytor is very down to earth and listened so well to my concerns and offered tremendous advice throughout the entire process. He is very knowledgeable and left me feeling comfortable and confident in my decision to proceed with my procedure. His entire staff is great as well, they were kind and helpful each step of the way. Fast forward to procedure day, I had mine done under local anesthesia in his office. Dr. Claytor and his team were phenomenal every step of the way. I felt safe and in good hands in their office OR. He explained to me what he was doing each step of the way to help make me feel comfortable. It was quick and painless, I went home and here I am 2 weeks out feeling great and very happy with my results!”
Endoscopic Brow Lift Recovery Timeline
Recovery from endoscopic brow lift is generally faster and more comfortable than traditional brow lift techniques due to the minimally invasive nature of the procedure.
- First 48 Hours: Mild to moderate swelling and bruising around the forehead and eyes are normal. Keeping your head elevated and applying cold compresses helps minimize swelling. Most discomfort is well-controlled with prescribed pain medication.
- First Week: Swelling and bruising peak around days 2-3, then gradually improve. You’ll return for suture removal around day 7-10. Most patients feel comfortable returning to desk work and light activities within 5-7 days.
- Weeks 2-4: Residual swelling continues to subside. You may notice some numbness or itching across the scalp and forehead—this is temporary and resolves over several weeks. Most visible signs of surgery have faded by week 3-4.
- 6 Weeks & Beyond: Strenuous exercise and heavy lifting can typically resume after 4-6 weeks. Final results become apparent as all swelling resolves and tissues fully settle into their new position.
Post-Operative Care
- Keep your incisions clean and dry
- Sleep with head elevated for the first week
- Avoid bending, straining, or heavy lifting
- Follow all medication instructions
- Attend all follow-up appointments
- Protect your forehead from sun exposure
Dr. Claytor and his team will provide you with detailed post-operative instructions and remain available throughout your recovery to answer any questions.
What Results Can I Expect?
Endoscopic brow lift creates natural-looking rejuvenation that typically lasts 7-10 years or longer. You’ll notice:
- A more youthful, alert, and refreshed appearance
- Softened horizontal forehead lines
- Reduced or eliminated frown lines
- Elevated brow position that opens the eye area
- Improved facial harmony and balance
- Natural-looking results that don’t appear “surgical”
Initial results are visible once swelling subsides (2-3 weeks), with continued improvement over 3-6 months as tissues fully settle. Most patients report feeling more confident and receiving compliments about looking “well-rested” rather than obviously “done.”
Maintaining Your Results
While brow lift results are long-lasting, your face will continue to age naturally. Dr. Claytor can combine your procedure with other treatments for comprehensive facial rejuvenation:
- Deep plane facelift for lower face and neck
- Upper blepharoplasty for eyelid rejuvenation
- Neuromodulators like Botox, Dysport, and Daxxify to maintain results and prevent new wrinkles
- Skin treatments like RF Microneedling to subtly tighten and improve skin texture
Why Choose Dr. Claytor for Your Brow Lift
With over 20 years of experience and double board certification, expert facial surgeon Dr. Claytor has performed hundreds of facial rejuvenation procedures at his private, Quad-A accredited surgical suite in Bryn Mawr. He understands that brow position significantly impacts your overall facial expression and appearance. His approach focuses on creating natural, harmonious results that don’t look “done” or overdone. Dr. Claytor offers this procedure under local anesthesia for patients who are good candidates and would prefer local over general anesthesia.
Dr. Claytor often combines endoscopic brow lift with other facial procedures like upper eyelid surgery (blepharoplasty) or deep plane facelift in Philadelphia to achieve comprehensive facial rejuvenation. During your consultation, he’ll assess your facial anatomy, discuss your goals, and recommend the most effective approach for your needs.
Show video transcript
The newest innovation in facelift surgery is endotine application for elevation of the brow as well as the midface. What is that? It is a small absorbable material that we can anchor into the skull so that we can use this to elevate the brow. One of the things that we use in addition to the cable sutures that come from Chia Chi Kao’s ponytail facelift which are amazing is the drill. When you engage this into the skull and you twist drills into the skull creating a partial little hole. So we make a small incision here to get access to the skull and then what we do is we come in with the drill and we engage it into the skull. We rotate this and that drills a tiny little hole right in here. Then we come in with the endotine, very very firm, but it dissolves way after 6 months. And it has tiny little teeth. And so we can lift up and elevate the brow upwards and secure it and anchor it here and here.
Depending on what the patient’s looking for, sometimes patients want to elevate their brow medially. You would anchor it here. Sometimes the patients want to elevate their brow laterally. You would place the endotine over here. So you’d get more of a lateral brow lift. It’s amazing how you can customize this. And because we do this with the patient awake, we can be talking to them, moving them, adjusting this to get it exactly the way they were hoping to achieve it.
Here’s the scope. These are the two different pieces. Goes in here. You could look through here, but we have a camera that attaches to here. This is where a light source goes, and you can put a syringe on here to be irrigating this. This lifts up the tissue, and the scope gives you unparalleled, beautiful visualization. So, as we come in here, we can go down and release all of the attachments here so that the brow can be elevated. And this gives you amazing visualization so that you can go down and look underneath the tissue through an incision that’s no bigger than this.
So, these muscles here are the purser and the corrugators, the ones that give you the mean face. We can evulse those and make them go away just like getting permanent Botox. Or if people want to keep their procerus and corrugator muscles, that’s totally fine. We can go down and all of this area gets released so that this will elevate up. And then we anchor the lifted tissue with the endotine after we’ve used the scope to visualize it. And then we come in with the drill to make the tiny little hole in the skull. And then we place the endotine there. So that can be used to lift up and anchor and secure the brow. That’s how you do the endoscopic brow lift. Thanks so much.
Dr. R. Brannon Claytor
Dr. Claytor is board certified by the American Board of Plastic Surgery and holds over 20 years of experience as a cosmetic plastic surgeon. An innovator and teacher in the field of plastic surgery, he uses advanced techniques like the drain-free tummy tuck and deep plane facelift to streamline recovery and provide natural-looking, durable results.
Frequently Asked Questions about Endoscopic Brow Lifts
If you’d like to talk one-on-one with Dr. Claytor and learn more about endoscopic brow lifts, contact Claytor Noone Plastic Surgery at (610) 527-4833 or schedule a consultation online.

Medically reviewed by Dr. R. Brannon Claytor — Updated on Mar 11, 2026
Areas Served:
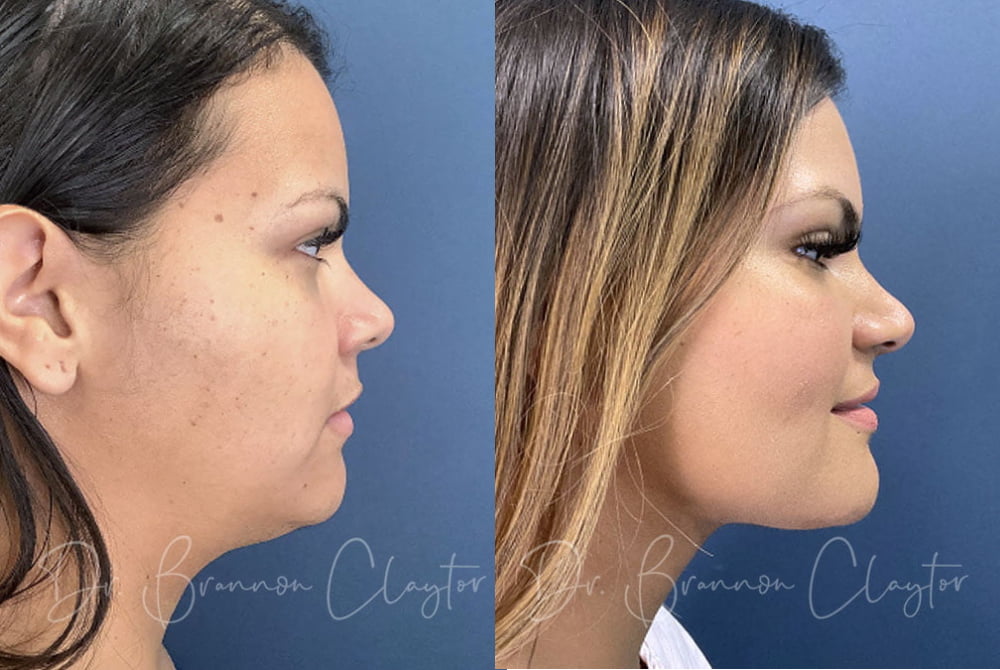
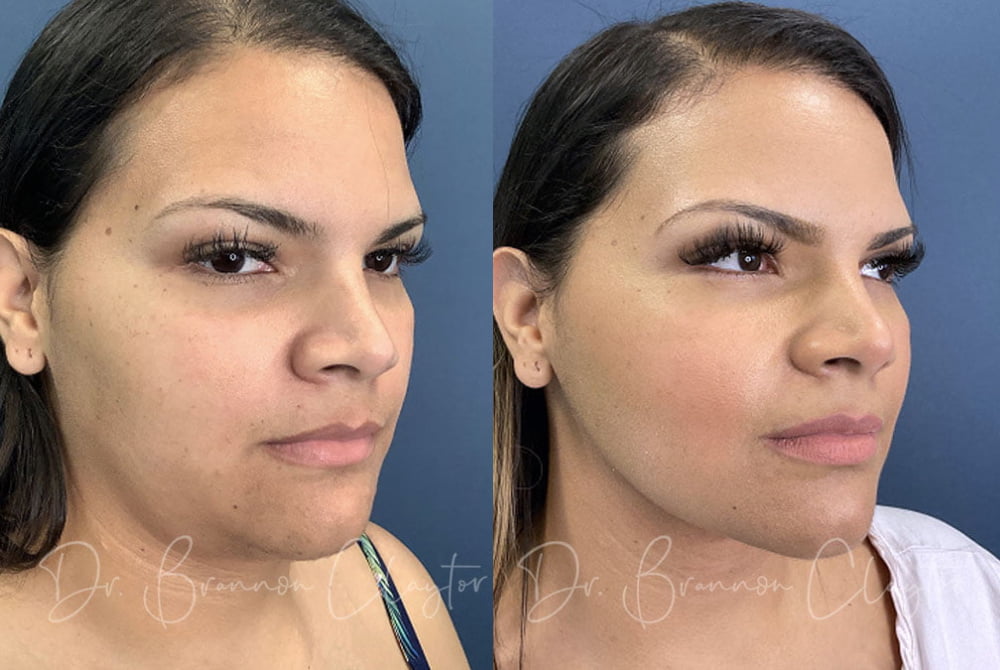
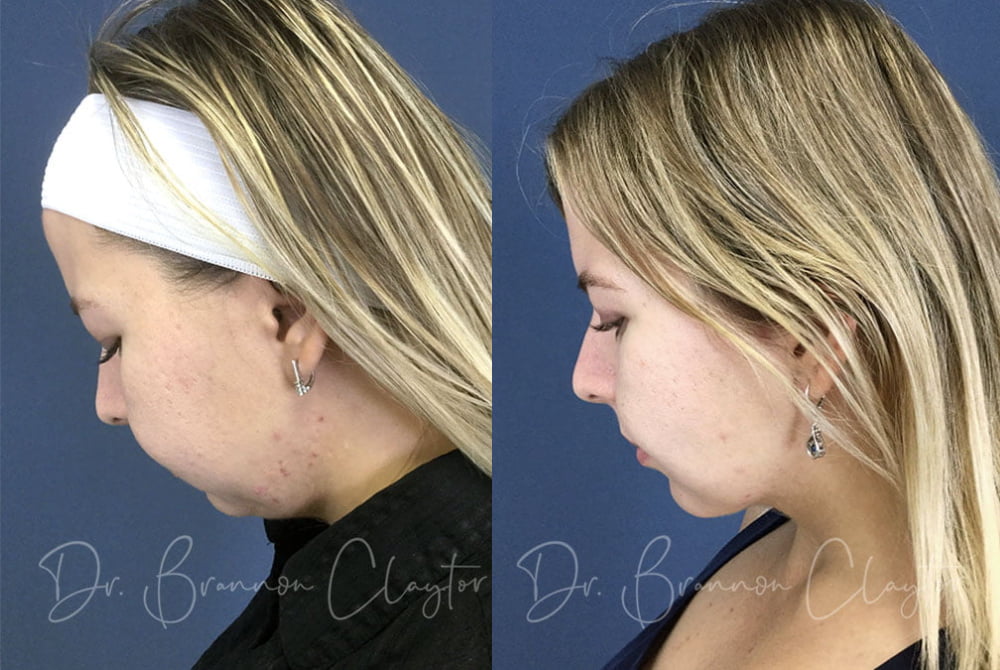
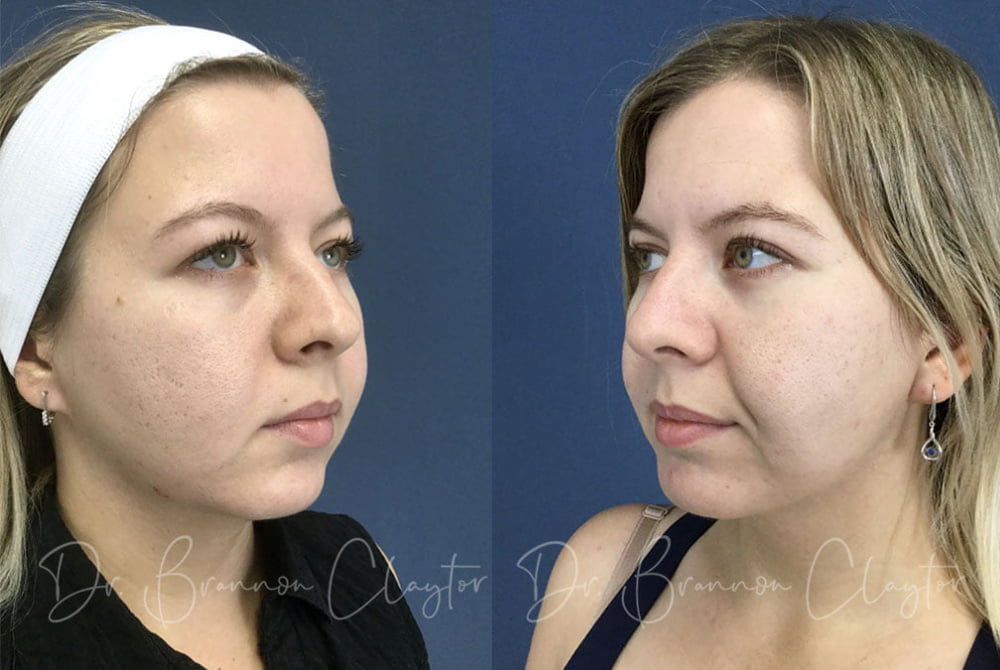
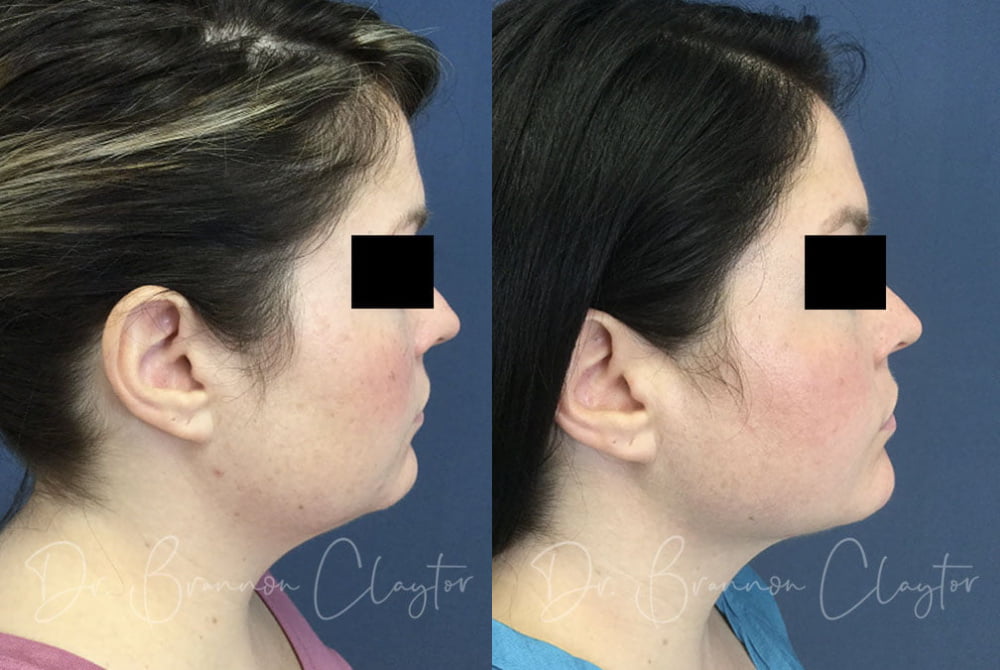
If you’ve been researching neck rejuvenation options, you’ve probably encountered a dizzying array of choices—from thread lifts to full surgical neck lifts, from injectable treatments to laser procedures.
That’s why Dr. R. Brannon Claytor developed his approach to the MIMS (Minimally Invasive Mastoid Sling) neck lift—a technique that bridges the gap between temporary non-surgical treatments and full surgical intervention. Here are seven reasons why it may be an excellent choice for your neck contouring goals.
1. Virtually Zero Visible Scarring
The MIMS technique’s sole incision is hidden behind the ear, in the natural crease where no one will ever notice it.
The goal of the MIMS neck lift isn’t just to tighten skin—it’s to recreate the beautiful angle between your chin and neck that defines a youthful profile.
2. Performed Under Local (Awake) Anesthesia
One of the most significant advantages of the MIMS procedure is that patients remain awake throughout—something that carries more benefits than you may initially realize:
- Reduced risks: General anesthesia carries inherent risks, including breathing complications, blood clots, and severe nausea. Local anesthesia eliminates these concerns.
- No post-operative grogginess: You’ll feel like yourself within hours, not days. That disoriented, foggy feeling common after general anesthesia simply isn’t part of this experience. Patients typically feel like themselves within hours, not days.
- Real-time communication: Because you’re awake and comfortable, you can communicate with me throughout the procedure. This collaborative approach allows for real-time feedback and adjustments.
- Faster overall recovery: Your body doesn’t need to process heavy anesthetic drugs, which means you’re back to feeling normal much sooner.
3. A Multi-Step Approach for Comprehensive Results
The MIMS technique isn’t a one-dimensional procedure—it’s a thoughtfully designed four-step approach that addresses all aspects of neck aging without lengthy scars:
- Tumescent numbing medication and epinephrine are injected into the treatment area via cannula to numb the area and minimize bruising.
- Liposuction removes stubborn fat deposits that diet and exercise simply cannot eliminate, sculpting the foundation of the new neck contour.
- Through the same incision, heat energy is applied with treatments such as laser to gently tighten skin from the inside out by stimulating collagen production.
- The third step is suture suspension, which provides the structural support that makes results last. A permanent suture creates an internal “sling” that holds the jawline in its new, more youthful position; absorbable sutures are applied to increase collagen production for firmer skin; and hemostatic net sutures are applied (these will be removed after 4-5 days) to promote healing.
Because of the suture step, patients will see an initial wrinkle where the suture is applied. Dr. Claytor may also recommend microneedling to help smooth and even the skin, if needed, after you have healed.
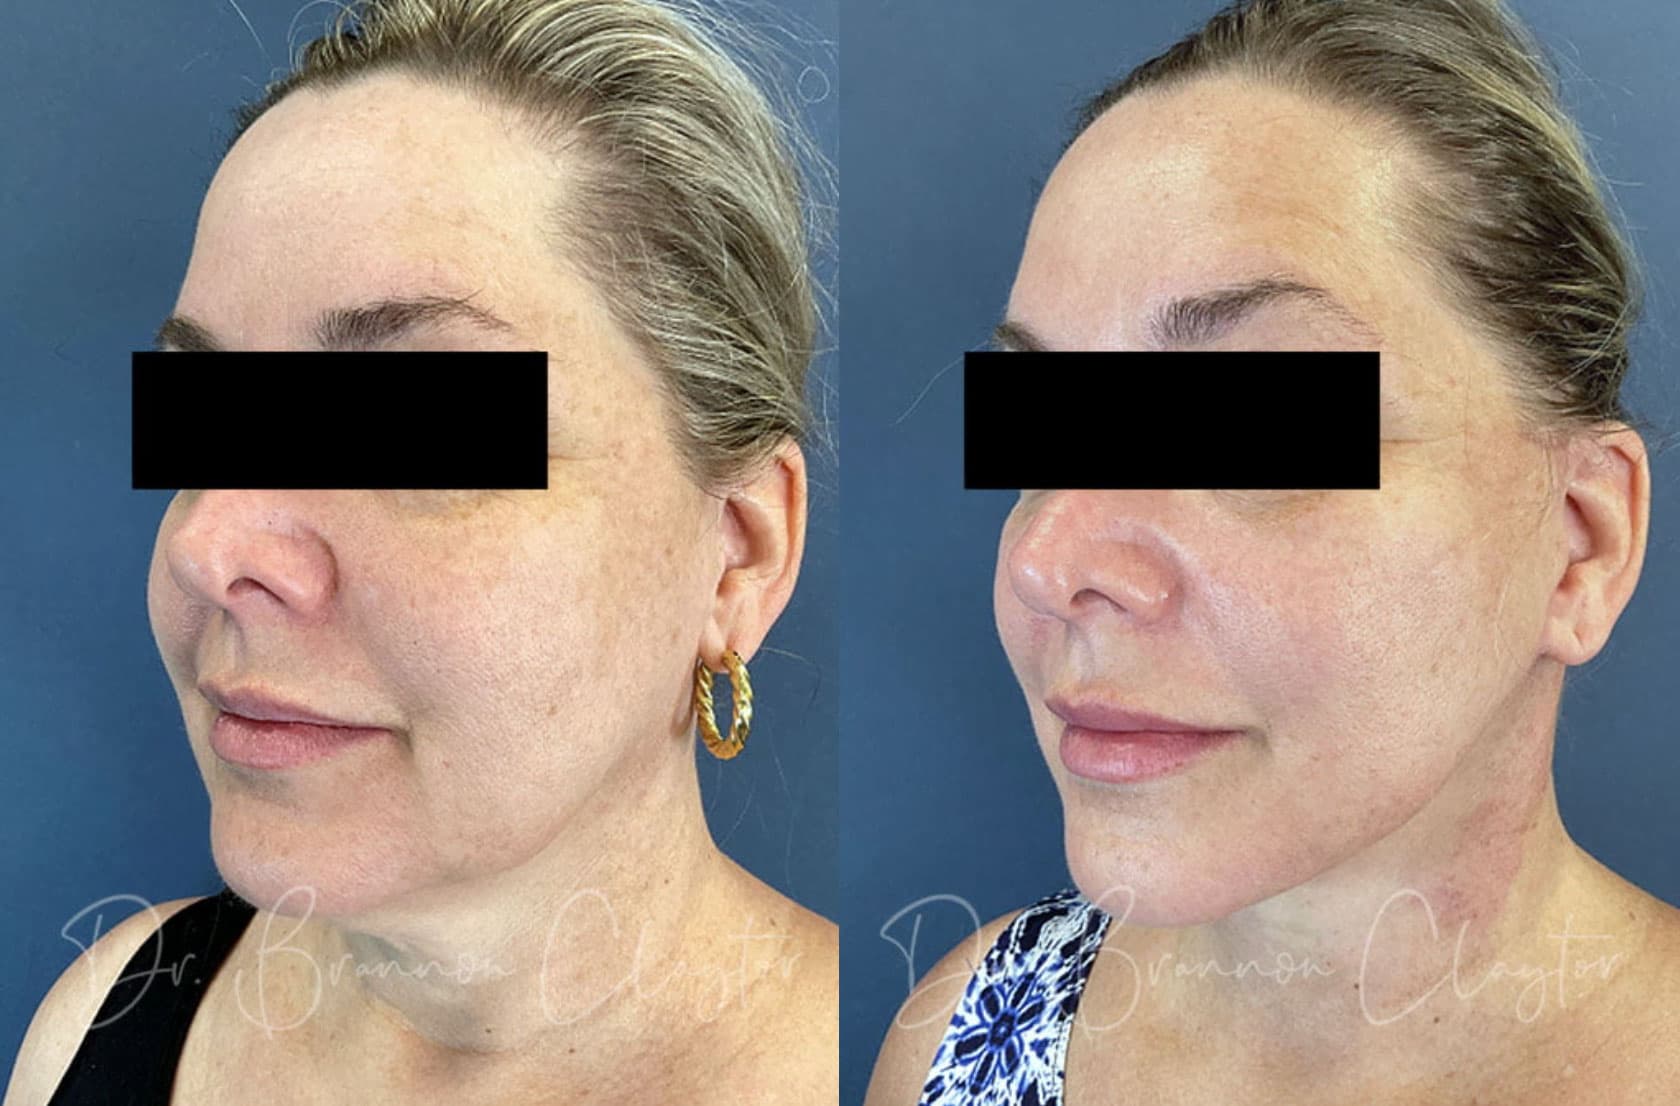
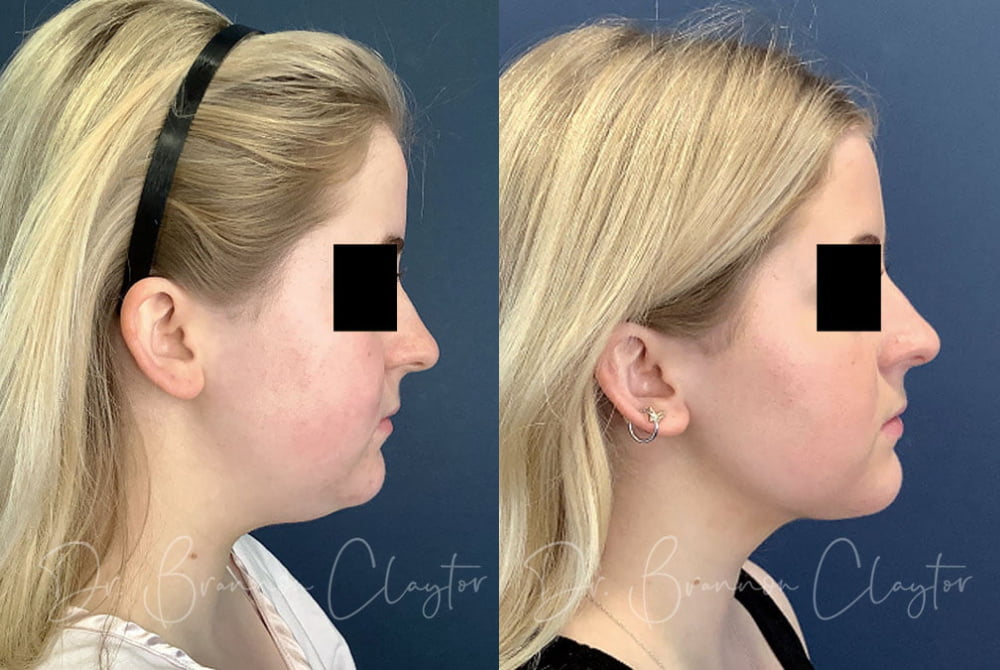
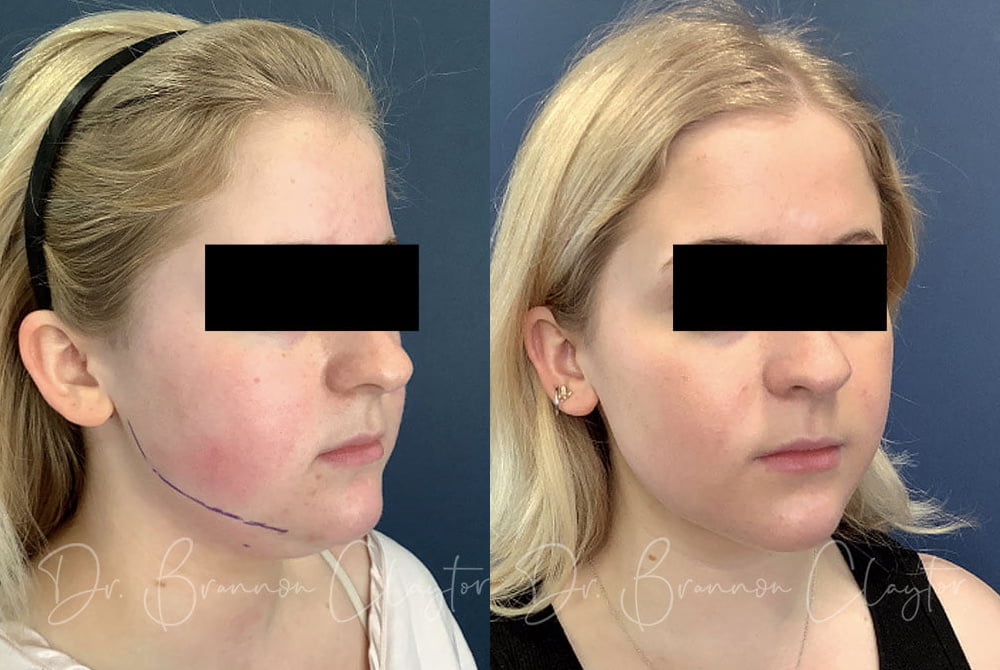
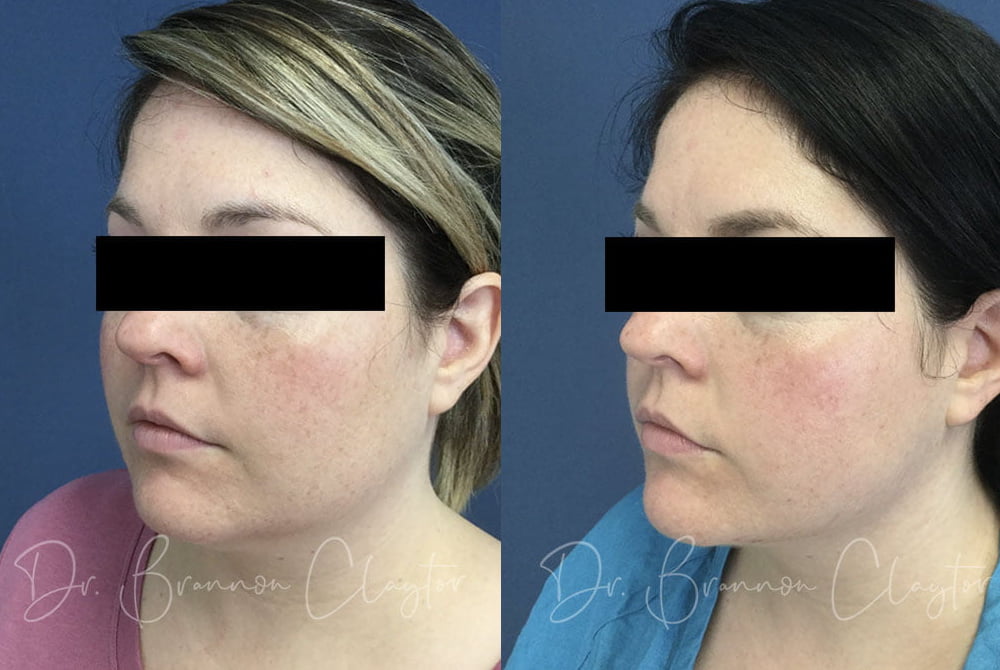
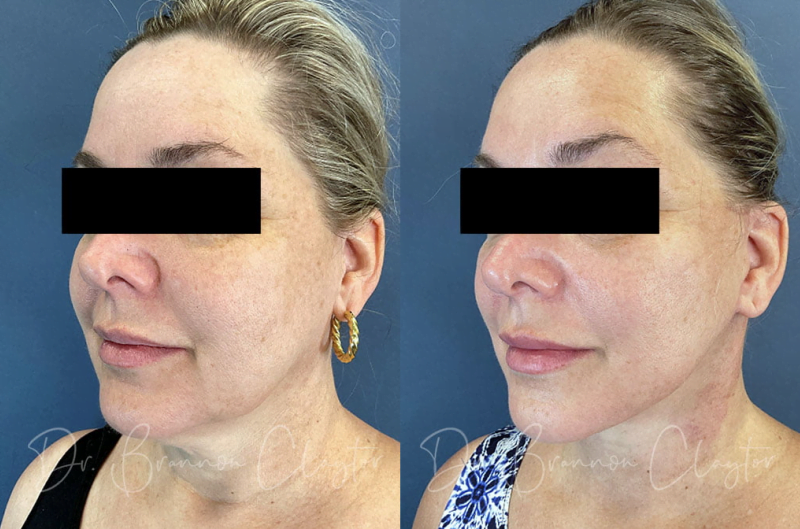
Before and After a MIMS Neck Lift
4. Recovery Measured in Days, Not Weeks
Traditional neck lift surgery typically requires 10-14 days before patients feel comfortable appearing in public, with full recovery taking several weeks. Most MIMS patients return to desk work within 3-5 days, feel comfortable in social situations within a week, and resume normal activities—including light exercise—within 10-14 days.
5. Natural-Looking Results Without the “Overdone” Look
Dr. Claytor emphasizes that the goal of any rejuvenation procedure should be to help patients look like themselves—just refreshed and rested. The MIMS technique excels at creating this natural enhancement.
The permanent suture creates a subtle but powerful transformation. By anchoring to the strong tissue near the mastoid bone and pivoting the pull precisely, Dr. Claytor can recreate that coveted right angle under the chin—what surgeons call a sharp cervicomental angle—without creating the “windswept” or “pulled” appearance that many patients fear.
The MIMS technique allows Dr. Claytor to achieve a stunning transformation through a single, virtually invisible incision.
6. Ideal for Early to Moderate Aging Concerns
The MIMS neck lift fills an important gap for patients experiencing early neck laxity or “softening” along the jawline, mild to moderate neck bands (platysmal banding), submental fullness (the beginning of a “double chin”), or loss of definition at the jaw-neck junction. These patients often aren’t ready for—or don’t need—the full surgical intervention of a traditional neck lift. MIMS is designed for these patients.
7. Long-Lasting, Durable Results
Unlike non-surgical procedures that may require retreatment every 6-9 months as the sutures dissolve, the MIMS technique uses a permanent suture placed at a deeper tissue level. This creates genuine structural support, not just temporary lifting.
While no cosmetic procedure stops the aging process entirely, patients who undergo the MIMS neck lift can expect their results to last for years. Many patients find that this procedure delays or eliminates their need for more extensive surgical intervention down the road.
WATCH: How the MIMS Neck Lift Works
Dr. Claytor is constantly working on innovations to streamline recovery and provide stellar results with minimal downtime. Follow us on Instagram to stay up to date on his research and new procedure offerings!
Ready to learn whether the MIMS neck lift is right for you? We invite you to schedule a consultation with Dr. Claytor at our Bryn Mawr office.
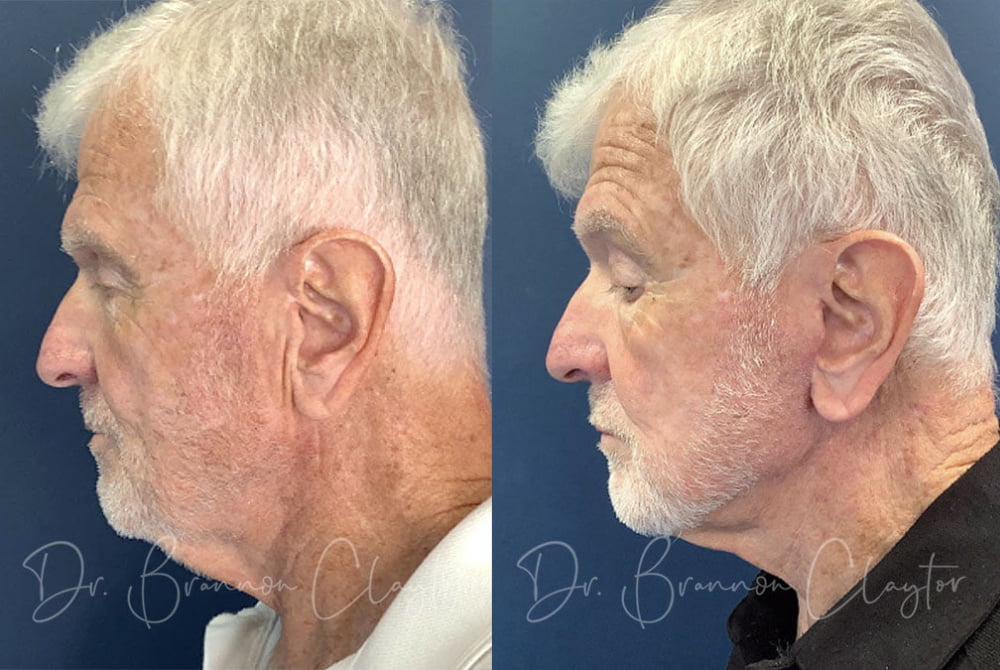
If you want to restore a youthful appearance in the face, a Philadelphia facelift generates a stunning improvement. The “after” photos reveal sweeping jawlines, youthfully high cheekbones—all completely natural-looking. But the first question that every Philadelphia patient asks is this: what’s the difference between a deep plane facelift and a SMAS (traditional) facelift?
Keep reading to learn what sets the deep plane technique apart, and watch the video below for Dr. Claytor’s demonstration with visuals!
Philadelphia plastic surgeon Dr. Brannon Claytor explains how the deep plane facelift technique differs from the more common SMAS plication facelift.
Show transcript »
Dr. Claytor here, sharing with you what a deep plane facelift is and how it generates that kind of improvement.
So here we have our lovely patient—her before and her after. Her biggest frustration is her neck and her jowls that have come down. What she’s looking for is a more youthful return to her previous self, and that’s really what we’re after. We’re not about changing people and making them look different. We want them to be the best version of themselves.
What happens when we age is we get facial descent. Our malar eminence—our bone here—it involutes and everything drops down. So what we start to see is downward descent of our face, and that is exhibited not only in jowling down here, but also in excess neck fat and skin down here. It’s very, very frustrating, and patients come in frequently saying, “Listen, this is not who I am. I look in the mirror and I don’t see myself.” And actually, in the profile view, it’s even worse.
So the goal of this operation is to rejuvenate the patient’s aging elements—to go into the face and lift back vertically what had been falling down inferiorly. The way we do this is with very small incisions that are hidden along the ear, what we call the hairline and the sideburn region. Then these come back and they’re hidden behind the ear, and then they come down along the hairline there so that they’re very well disguised. Not infrequently, I will also go up into here, which gives me access to be lifting in that orientation.
That takes us to: what is the difference between a SMAS plication and a deep plane facelift? That question comes up every single time a patient comes in for a consultation, and so it’s a great question. We’re going to answer it here.
Here we have our platysma muscle in our neck. It really has no function other than being a muscle of animation—you move it around and you can see your neck muscles move. It has nothing to do with actually moving your head. Right along here is our mandible, and the mandible comes down along here. Below the mandible is where you have your platysma muscle. Above the mandible is where you have your SMAS muscle, which stands for Superficial Musculo-Aponeurotic System.
So you go from skin to SMAS, down to the muscle, and then you go down deeper to the bone.
When people have a SMAS plication, what’s happening is the SMAS aspect of it is lifted and plicated up here, and it’s for a very superficial lift. You’re really only getting about that much lift. Some people will go down here with it and allow the whole area to lift up, but that’s what a SMAS plication is.
In the deep plane lift, what we’re doing is we are going underneath that SMAS. This SMAS is continuing up here, and so you’re making the incisions that we’ve marked here. We’re lifting up that tissue, we’re moving in underneath the skin layer, and then we’re coming up to this SMAS. What we do in the deep plane lift—so this is the deep plane—is that we make the incision pretty much from the lateral aspect of the eye down to the corner of the jaw, sort of in this orientation. That’s where we make the incision down into this SMAS to go up underneath it. So that’s the deep plane aspect of it.
While we’re there, we come across these retaining ligaments. These are very, very stout ligaments that sit here and here and here, and they’re what keep the face’s soft tissue from being advanced superiorly. They’re sort of, if you will, giant stakes in the ground that are preventing anything from moving around.
So we need to go in first in the deep plane dissection and dissect into the spaces in between these retaining ligaments. We dissect down into here, we dissect down into here, and we dissect down into here, so those tongues, if you will, are opened up. Then we can very clearly see what’s going on, and we come across the retaining ligaments as we try to connect these two.
What makes this operation so challenging are the facial nerves that are traveling in this area. They are very delicate, they’re very small, and they need to be treated with tremendous caution. Interestingly, the nerves run very close to the retaining ligaments, so as you’re releasing the retaining ligaments, you need to be looking for the very delicate facial nerves. The facial nerves come out from underneath the ear into a pattern that’s somewhat like this.
So you can see that the deep plane facelift basically goes right along where the facial nerves are moving from behind the ear out into innervating the facial musculature. And again, this is what makes this operation so incredibly technically challenging.
But if you can understand these different tongues that are advanced in between the retaining ligaments and then, therefore, allow connection between these two to further release and identify and remove these retaining ligaments—once these retaining ligaments are released, now this entire area is very mobile and can be repositioned.
If you look at people on a three-quarter view, patients who have a very high cheek area have a very youthful and aesthetic appearance. When we age, that cheek area drops down. In that three-quarter view, you see that area drop down and then it bunches up down here in the jowls, which is really what gives you that aged appearance.
So by mobilizing this SMAS after you’ve released the retaining ligaments—remember I said that this area gets lifted—imagine that this entire area is now lifted up this way. Now sutures can be attached once these areas are connected and the retaining ligaments have been released and you’ve very delicately worked around the facial nerves and left them intact. Now the sutures can be secured here and up here, and that’s what takes this tissue and elevates it superiorly. That’s what creates the tremendous power and effect of the deep plane facelift.
If we move over to our after patient, why does she look different? She looks different because all of these tissues have been moved up and we’ve been able to reposition her malar eminence back in a more youthful position. That’s part of it.
The other part of it is down in the neck. How do we create this beautiful jawline? Well, the way you do that is by coming down along the mandible here and releasing that platysma muscle—again, needing to be very careful of the facial nerves. But these are similarly, just like these tongues into and underneath this SMAS, this is released along here, generally almost to about the corner of the mouth or what we call the marionette line. So the release of the platysma is all the way along to there. By releasing that, now you’re able to take this platysma muscle, which is part of the hanging, sagging skin of the neck, and lift it and reorient it. In addition, all the fat that’s in here is removed—so all that excess fat we take out.
Now once that’s released, the muscle is then elevated and secured back here, back into the mastoid fascia, and that’s what creates that incredibly powerful, strong neckline. The jawline—there’s the mandible. Now that muscle which used to go this way, now the muscle comes up here and it’s very nicely secured back to the mastoid fascia here.
So with the platysma muscle section underneath the jawline, that creates this gorgeous, sharp neckline and incredibly well-defined jawline. In combination with this SMAS now being elevated superiorly and secured in this orientation, it gives you a 5-10 year lifting result of rejuvenating and refreshing and giving you that youthful appearance.
So the big difference again between SMAS plication and the deep plane facelift is: in SMAS plication, you’re really just reefing up a small portion and you’re not releasing the retaining ligaments. As opposed to the deep plane facelift, you’re going in underneath this SMAS, you’re identifying the facial nerves, you’re identifying the retaining ligaments, and you’re releasing the retaining ligaments.
I can’t stress enough—really, the biggest difference between SMAS plication and the deep plane facelift is the ability to release those deep retaining ligaments. And that’s what gives you that very sustainable and dramatic lift and addresses the jowl and addresses the cheek region and gives you that youthful shape back to your face.
I hope you found this helpful. Looking forward to making more of these videos to help explain some of these complex issues that are becoming more commonplace when patients come in and they’re bringing up topics. Patients are coming in today much more educated, and it’s so fun to be able to share this information in a digestible form so that when you come in, you’ve got a framework to ask the questions as you’re looking for your rejuvenation journey.
Thanks so much.
SMAS plication facelift
The most common type of surgical facelift, an SMAS plication facelift works on a shallower layer of tissues than the deep plane facelift. The SMAS is the superficial musculoaponeurotic system below the skin in your mid-to-lower face. “Plication” is the term for a surgical tightening of tissues, which usually involves lifting, removing excess, and rejoining remaining tissues. In a SMAS plication facelift, the SMAS layer is lifted vertically and re-anchored in front of the ears to create a lift of about 1 cm. Some surgeons may also lift from further down into the cheek, at the front of the earlobe, for expanded effects. Still, even an expanded SMAS facelift procedure cannot compare with the more comprehensive improvements offered by a deep plane facelift.
Deep plane facelift, step by step
A deep plane facelift leaves the SMAS intact, instead requiring your surgeon to access deeper attachments in the cheeks and lower face to raise and tighten tissues. Here are three major steps in the surgery:
1. Incisions are made within the hairline and in the natural folds of the ear.
A deep plane facelift is performed through discreet incisions placed in the sideburn area, within the folds of the ear, and along the hairline behind the ear at the back of the neck.
Not infrequently, Dr. Claytor will also create an incision within the hairline above the ears (just behind the temple); this allows him to lift the SMAS of the face at another important vertical axis, which may be more beneficial for certain patients.
2. The SMAS is separated, retaining ligaments are released, and the tissue is anchored higher for a defined cheek and firmer jowl area
SMAS is surgically separated from underlying tissues to allow Dr. Claytor to reach the retaining ligaments. These ligaments have a strong hold on the tissues of the cheek and lower face, keeping tissues in position. Thus, Dr. Claytor releases them in order to be able to lift the skin, fat, and SMAS higher on the facial bone structure. The skin is sutured gradually in the newly raised position, and anchored above the ear.
Ligament release is the primary step that makes the deep plane facelift so different from the SMAS technique: it allows for more impactful, dramatic results because the cheek’s youthful, high shape—a.k.a. the malar eminence—can be more fully restored, resulting in a stunning, youthful sweep in the mid-face.
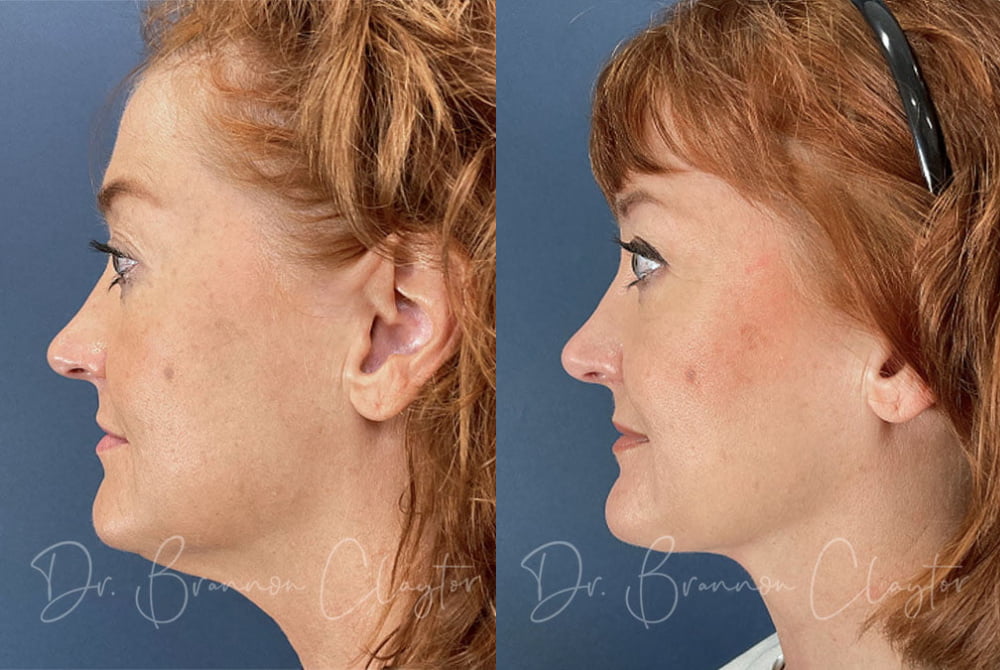
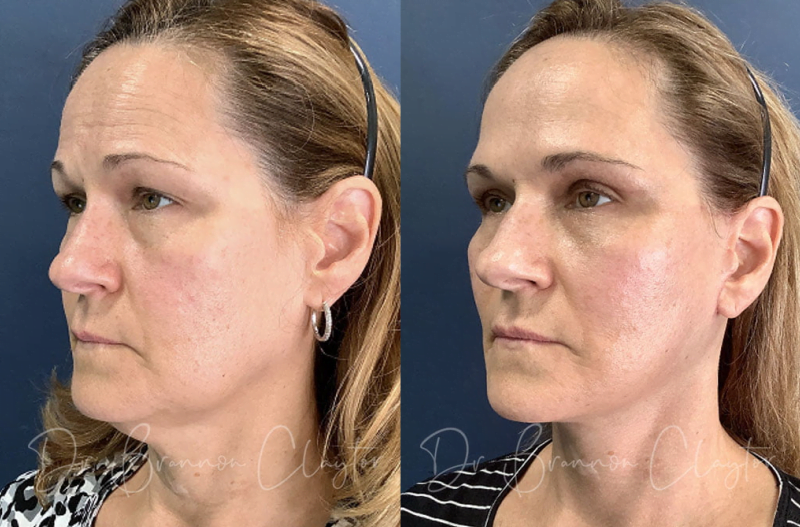
3. Neck bands are released and anchored higher for a chiseled jawline.
In the neck, rather than SMAS, you have the platysmal muscles located below the ear, beneath the mandible, and toward the front of the neck. These muscles form the tight, vertical lines you see at the front of your neck when you clench your jaw (they don’t affect how you move your head).
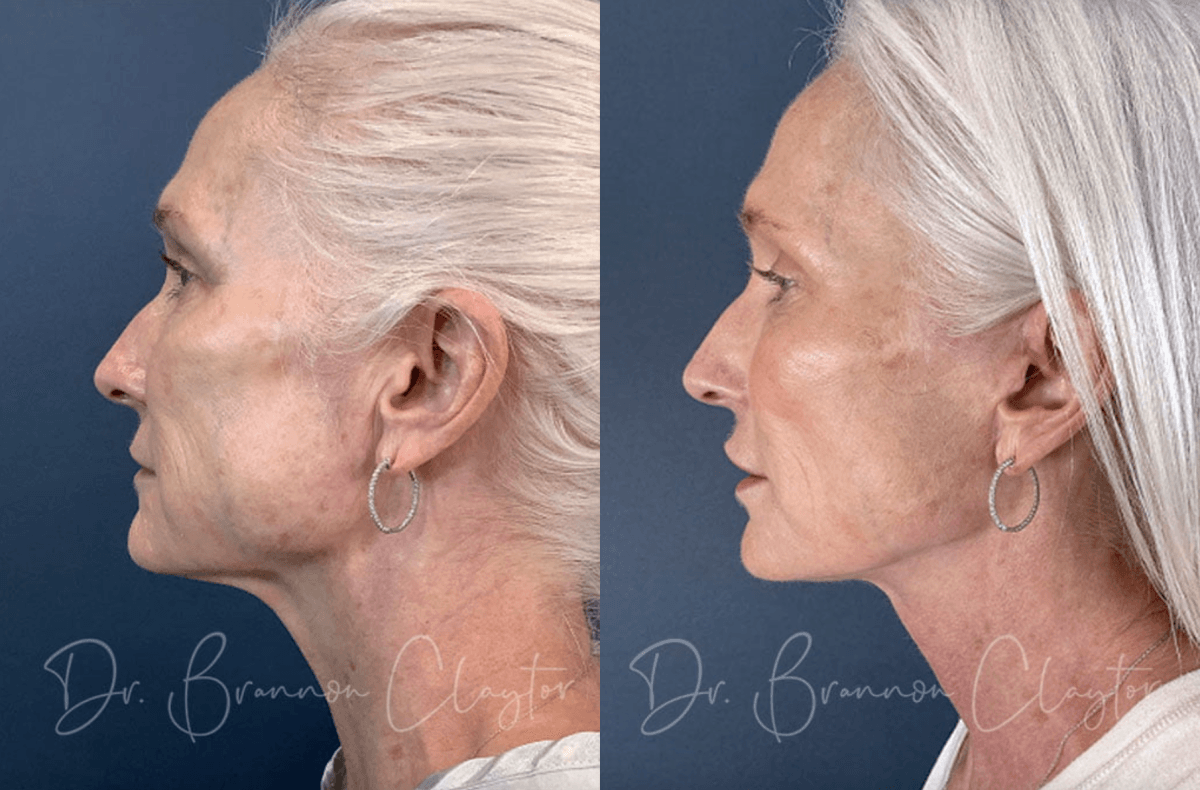
To create a sweeping, more youthful jawline appearance, the platysma is released along the jawline, allowing Dr. Claytor to anchor these muscles behind the ear. This can create a chiseled mandible or jawline, as you can see in this before and after photo:
The importance of an experienced, expert deep plane facelift surgeon
A deep plane facelift works on the same layer of tissues where your facial nerves lie. Nerves spread from below and behind the ear, out into the cheeks, jawline, and below the eye area. The nerves that thread throughout the facial ligaments are released in a deep plane facelift, so it’s critically important that your surgeon is well-versed in this anatomy and in techniques for maintaining the integrity of facial nerves. Once a surgeon dissects below the SMAS layer of the face, they must identify and very delicately operate around the nerves.
Do not settle when it comes to choosing a board-certified plastic surgeon: avoid surgeons who offer below-average pricing, or who don’t have the before and afters, reviews, plastic surgery credentials, and reputation that prove they can safely achieve excellent facelift results. Dr. R. Brannon Claytor teaches his deep plane facelift technique at national meetings of plastic surgeons, and is widely considered to be a deep plane expert.
“The whole experience was fantastic! The results exceeded my expectations! I look and feel 10 years younger. Dr. Claytor and his staff made me feel so at ease and comforting. He is an excellent surgeon with a wonderful bedside manner and personality. It is one of the best decisions I ever made. I would highly recommend Dr. Claytor; in fact my neighbor has an appointment with him next month.”
Should I consider a deep plane facelift?
Patients who are good candidates for deep plane facelifts often come to us with loose skin that has succumbed to gravity, including forming jowls (loose skin around the jawline and chin) and sagging in the neck. As we age, we experience facial descent: our cheek structure (malar eminence is the technical term) involutes, and what we start to see is downward descent of our face—creating jowling, and excess neck skin and fat.
A good candidate for this procedure is looking to return to a more sculpted jawline and reduced wrinkles. Dr. Claytor’s goal is to help you look like the best version of yourself: We’re not here to make you look like someone else!
If you’re ready to experience these rejuvenating results yourself, we’d love to meet with you to discuss options! Dr. Claytor serves patients from all over the Bryn Mawr, Main Line, & Philadelphia areas. Call 610.527.4833 or contact our Philadelphia plastic surgery practice online to schedule your personal consultation with Dr. Claytor today.
As you age, your skin gradually loses elasticity—and the more delicate skin of your neck will likely show visible signs of aging before they become apparent on your face. Some people are also genetically predisposed to having weaker, less defined contours along their neck and jawline. MyEllevate® neck lift is minimally-invasive and has emerged as a highly-effective solution, offering a near-permanent way to quickly rejuvenate the neck without invasive surgery.
Here, facial plastic surgery expert and double board-certified plastic surgeon Dr. Brannon Claytor answers 7 MyEllevate FAQs to help men and women in the Bryn Mawr and Main Line areas make informed decisions about how they can achieve a confident, more sculpted neck appearance.
What is MyEllevate?
MyEllevate is a minimally-invasive neck lift procedure designed to tighten and lift neck skin to increase definition in your neck and jawline and thus achieve a more youthful, rejuvenated appearance. MyEllevate uses an ICLED® light-guided suture system which allows the surgeon to precisely place permanent sutures at specific pivot points underneath the skin to lift and anchor neck tissues for optimal results personalized for your unique anatomy.
The minimally-invasive approach is considered non-surgical—the sutures are placed without the need for general anesthesia using tiny, virtually invisible punctures only 2mm long. MyEllevate does not require skin excision and achieves natural-looking, long-lasting results that are ideal for younger patients who do not yet need a full facelift or neck lift.
How does MyEllevate treatment work?
Once you are completely numb using a local anesthetic and resting comfortably, a thin needle-like device with an illuminated tip is inserted beneath your skin to help determine the ideal depth for suture placement to redefine your neck contours.
Eight tiny entry points are made to serve as anchor sites to keep the neck tissue suspended in a naturally tighter position—two of these entry points are located in the dense tissue behind the ear for optimal support, and the other six entry points are located along the neck and the chin to allow the continuous passing of the suture.
Once each suture is in place, they create a “sling” to evenly lift and support your neck tissues to create a smoother, more defined neck and jawline contour.
How much does MyEllevate cost?
The cost of MyEllevate will depend on the level of treatment needed to achieve your aesthetic preferences. Some patients might require a combination of procedures in their treatment plan to achieve their desired outcomes; those with excess skin may require some skin removal, while those with stubborn fat deposits under the chin may benefit from SmartLipo® to eliminate it.
Convenient financing options help patients address all the factors preventing them from looking and feeling their best with affordable payment plans.
How long do MyEllevate results last?
The sutures placed during the procedure are permanent; one of the most appealing aspects of MyEllevate is the longevity of results. Most patients enjoy their improved neck contour and jawline definition for 3 to 5 years or longer, depending on individual factors like skin quality, age, lifestyle, and genetics.
While MyEllevate provides long-lasting improvement, it’s important to understand that it doesn’t stop the natural aging process. Over time, factors like gravity, sun exposure, and collagen loss will continue to affect your appearance. However, many patients find that even as subtle changes occur, their results remain significantly better than before the procedure.
To maximize the longevity of your MyEllevate results, we recommend maintaining a stable weight, protecting your skin from sun damage with daily SPF, staying well-hydrated, and following a quality skincare routine. Some patients choose to combine MyEllevate with other treatments like Botox or skin tightening procedures for enhanced, longer-lasting rejuvenation.
Your age at the time of your procedure, skin elasticity, and lifestyle habits will contribute to the number of years you enjoy the effects of a MyEllevate neck lift.
Is the MyEllevate procedure painful?
One of the advantages of a minimally-invasive neck lift is that it is performed in our office using only local anesthesia yet achieves immediate and dramatic results. You’ll be numb but awake and able to communicate throughout the process, typically an hour or less. Some patients report a mild tugging sensation or slight pressure during their procedure; however, most patients describe the short procedure as easily tolerable and feel their results were well-worth any temporary discomfort. We have additional sedation options for patients who wish to increase their comfort; MyEllevate is also safe to combine with procedures that require general anesthesia.

What is the recovery process like after MyEllevate?
After your procedure, you’ll be fitted with a chin strap to help support the newly repositioned tissue and limit swelling. You will then go home to take it easy, and be able to see your results at your post-operative check-up the following day!
Post-procedure care is relatively minimal as there are no linear incisions to care for—you’ll be able to shower the day after your minimally-invasive neck lift. Most patients experience only minimal bruising or swelling and often return to work and other daily errands within a day or two with hardly any visible signs of just having a procedure.
You may feel mild tension behind your ears at the anchor points; however, this sensation quickly dissipates after a few days. Over-the-counter pain relievers can help minimize any post-procedure discomfort.
In sum, there are few restrictions after a MyEllevate neck lift—you’ll simply be asked to delay strenuous exercise and heavy lifting for a couple weeks to avoid increased swelling.
What is the difference between MyEllevate and neck lift surgery?
The primary difference between MyEllevate and a traditional neck lift is the level of invasiveness with each procedure.
MyEllevate is considered minimally-invasive and can safely and comfortably be performed under local anesthesia—an attractive alternative for patients with only mild skin laxity who do not require extensive correction to achieve their aesthetic goals. MyEllevate’s subtle, natural-looking results improve the neck’s appearance without the need for a surgical procedure and a longer recovery period.
In contrast, a traditional neck lift is a comprehensive surgical procedure involving incisions, excess skin removal, and tightening of the underlying muscles to achieve a more contoured silhouette. The recovery time of a neck lift is about two weeks, and this more invasive approach carries some risk, as is expected of all surgical procedures. Patients with significant skin laxity see stronger rejuvenation effects and longer-lasting results with a surgical neck lift.
It’s essential to consult with an experienced, board-certified plastic surgeon specializing in a range of facial rejuvenation techniques to determine which procedure best suits your individual needs and goals.
Can MyEllevate be combined with other procedures?
Yes, MyEllevate is frequently combined with other treatments for comprehensive neck rejuvenation. Dr. Claytor often pairs MyEllevate with SmartLipo to remove excess fat under the chin, as seen in many of our patient examples. The procedure can also be combined with facial treatments or performed alongside other cosmetic procedures. During your consultation, Dr. Claytor will evaluate whether additional treatments would help you achieve your desired results and can safely perform multiple procedures in one session when appropriate.
Video Transcript
Dr. Claytor here. Wanted to share with you the non-surgical neck lift. How does that work? First of all, we need to understand anatomy. So here we have the patient’s jawline. Here’s their jawbone. Here is the underlying bony structure and here is that contour on the neck with that hanging fat. And so it’s not just an excess amount of skin but it’s also extra fat. So how do we deal with that?
First thing we have to do is come in with liposuction, so that’s a liposuction cannula. Then we take and come in just behind the ear and go down here and suction out that fat. And so you can see these small holes at the end of the liposuction cannula suck out that fat. And that helps reduce the amount of fat volume that’s in the neck. That was really all we had years ago.
And then we moved on and we developed the precision TX SmartLipo laser. So this is a laser that we can put in also just behind the ear and reach down here, or you can also enter just underneath the chin here and come in. And the thing that’s unique about the Precision TX SmartLipo laser is that it’s bi-directional. It shoots out the end of the laser as well as out the side so it’s a side-firing laser as well. And what that allows me to do is turn, and so I can turn that laser and shoot out at the skin, or I can shoot down at the underlying muscle. When I shoot out at the skin I’m tightening the skin. When I shoot down at the muscle I’m removing the fat layer in addition to the liposuctioning.
Then, really, the exciting part about the non-surgical neck lift is the Ellevate suture. This is a absolutely transformative part of neck rejuvenation. And the reason for that is we can remove this fat, we can tighten the skin, but ultimately we’re left with the basic triangle that makes up the angle of the jaw. And we’ve got this extra skin here. If you want to take this distance which is longer than this distance and bring that tissue back up and recreate that beautiful neckline.
So how do we do that with the Ellevate suture? So this is the device here; it detaches so that I’m able to pass it through and then reattach it to the light source. And the reason the light source is important is it helps get it that exact level as you’re doing that tissue dissection. And so you start out right here in the middle: so we’ll bring down our magnets. which represent the pivot points. Again remember the first part is the liposuction where we go in with the cannula and we remove most of the fat cells. Now the problem with that, if you do that then you may have the hanging skin. So you come along with the precision TX SmartLipo laser and you go in and—remember it’s bi-directional so you can be firing the laser into the skin which helps with skin tightening and also removing more of the fat.
Now we need to work on taking that loose skin that’s had the fat removed with liposuction and the skin tightened with the Precision TX, and we need to tighten it using the Ellevate suture. So the way we do that is this enters into the tissue and then I slide it along here and then pull through the suture. So effectively what this looks like is, I put this stitch here and then I reattached this, and now I’m able to tunnel over to my next point. And so I go over to here and then when I pop out of the skin I’m able to pull this through. And this sits like such. So you can start to see how this suture underneath the skin is going to allow for the redraping and pulling.
The real key is that we need to anchor it up here. That is the anchor. Now we’re going to come up to here—the suture is going to go along to here. And then we’re going to go up tunnel again further and come out right behind the ear. The ear has a dense amount of connective tissue attached to the mastoid bone and will allow us to anchor the suture as we’re pivoting and coming back down here where we want to have the pull, and pull this tissue back but it needs to be anchored off of here. So now we come along here, bring it through here, pop it out, draw it through the tissue, and the suture ends right here. So you can see that by pulling on this, what’s going to happen is this tissue will be moved. Now that tissue will be moved back in that direction by the pull that’s pivoting off of that anchor. As the suture pulls, everything that’s been loosened up with the liposuction and the Precision TX allows now the new neck contour comes like that.
The truly amazing part of the Ellevate suture technique is as this is tied together—and this is a permanent suture—that takes and moves this neckline back and creates this beautiful jawline and it holds it because it’s permanent. It’s percutaneous because the biggest incision that I had to make was as big as this which is about two millimeters in size. So they’re virtually invisible incisions. And then the most important thing is that the old neckline, which was here, if you draw a line out comes out some point over here. Now the new neckline: you draw a line up here, comes right through the base of the nose. By doing so, now this beautiful neckline has been created, and it’s being held in place with the Ellevate suture after the fat was liposuctioned out and the skin and muscle were tightened with the Precision TX Smart Lipo. So this is the minimally invasive—or really even you could call it the non-surgical—neck lift. I hope you found this helpful. Thanks so much.
How does MyEllevate compare to thread lifts?
While both are minimally invasive, MyEllevate offers significantly more durable results than thread lifts. MyEllevate uses permanent braided polyester sutures placed deeper in the tissue to create a supportive “sling” that addresses underlying muscles and glands. Thread lifts use temporary PDO threads placed more superficially that dissolve within 6-9 months. MyEllevate’s continuous loop design and permanent sutures provide the structural support needed for long-lasting neck and jawline definition, while thread lifts offer only temporary skin lifting that requires regular retreatment.
“The whole experience was fantastic! The results exceeded my expectations! I look and feel 10 years younger. Dr. Claytor and his staff made me feel so at ease and comforting. He is an excellent surgeon with a wonderful bedside manner and personality. It is one of the best decisions I ever made. I would highly recommend Dr. Claytor; in fact my neighbor has an appointment with him next month.”
Dr. R. Brannon Claytor
Dr. Claytor is board certified by the American Board of Plastic Surgery and holds over 20 years of experience as a cosmetic plastic surgeon. An innovator and teacher in the field of plastic surgery, he uses advanced techniques like the drain-free tummy tuck and deep plane facelift to streamline recovery and provide natural-looking, durable results.
Double board-certified plastic surgeon Dr. Brannon Claytor at Claytor Noone Plastic Surgery has over 20 years of experience performing a range of surgical and non-surgical procedures and has established himself as the premier choice in the Main Line and Bryn Mawr, PA areas for face and neck rejuvenation. To learn more about MyEllevate neck lift or any of our other safe and transformative procedures, please call our practice at (610) 527-4833 or fill out our online form.
Areas Served:
“Turkey neck exercises,” the videos promising to smooth a sagging neck with a bit of face yoga, rack up millions of views. But can simple moves really erase loose skin and restore a defined jawline? Below, Philadelphia board-certified plastic surgeon Dr. Brannon Claytor shares what science (and decades of neck-rejuvenation experience) tells us about exercises, non-surgical technologies, and his signature neck-lift techniques.
Why does a “turkey neck” form in the first place?
Age, genetics, sun damage, weight changes, and gravity weaken the platysma muscle (vertical bands of muscle along the neck), thin the skin, and allow fat to accumulate beneath the chin. The result is loose, drooping tissue often called a turkey neck.
Can exercises tighten a sagging neck?
The evidence is thin
Facial-exercise routines can tone muscles, but there is little scientific proof that they meaningfully tighten skin or erase deep neck laxity.
Subtle, not surgical results
Daily neck moves may offer subtle improvement for mild muscle slackness—and they’re generally harmless to try—but any visible change is typically modest at best and falls short of what patients expect from professional treatments.
To put it simply, neck exercises are no match for moderate to severe sagging neck skin or prominent neck bands.
How long until I see results from neck exercises?
The exercises circulating online typically promise results within weeks or months of consistent practice. However, the reality is that turkey neck is caused by loose skin, weakened platysma muscles, and fat deposits—issues that cannot be resolved through exercise alone. While you might notice slightly improved muscle tone after weeks of daily effort, this won’t translate to the tighter, smoother neck contour you’re hoping for.
Here’s why timeline doesn’t matter:
- The root cause isn’t addressed: Exercises can’t tighten loose skin or remove excess fat
- Results are negligible: Any changes are typically so subtle they’re imperceptible to others
- Benefits don’t last: Even minor improvements disappear quickly once you stop
- You’re investing time without return: Months of daily effort rarely produce visible change
If you’ve already been doing neck exercises consistently for several months without seeing improvement, this confirms what the research shows: exercises simply aren’t an effective solution for turkey neck. There are, however, proven treatments that can deliver the dramatic results you’re looking for.
““I can’t say enough wonderful things about Dr. Claytor, and the entirety of his staff. This was my second procedure with him- from initial consultation through procedure and follow up, you can tell that he cares immensely for both his patients and his staff. I wish more doctors were like Dr. Claytor!!! I wouldn’t hesitate to recommend his practice to anyone. If you are wanting a surgeon that you know you can trust, and that will care for you and give you excellent results – he’s your guy!””
Proven Non-Surgical Options for a Turkey Neck
When concerns are early or mild, Philadelphia neck lift expert Dr. Claytor recommends office-based treatments that stimulate collagen or refine contours without surgery:
| Concern | Med Spa Treatment | How It Helps |
| Uneven tone & crepey skin | CO2 laser skin resurfacing or IPL | Heat energy triggers collagen renewal for smoother texture and tighter skin |
| Fine lines & mild laxity | Morpheus8 RF microneedling | Microneedling + radiofrequency tightens deeper dermis for firmer neck skin |
| Vertical muscle bands | Botox® (platysma “Nefertiti” injections) | Temporarily relaxes tight cords, softening neck lines |
| Early fat pocket | Kybella® | Dissolves small fat deposits with no downtime |
| Skin texture & laxity | LaMiNa (Dr. Claytor’s proprietary combination of CO2 laser resurfacing, microneedling, & nanofat infusion) | Stimulates skin regeneration to improve firmness, reduce crepey texture, and enhance overall neck contour |
Minimally Invasive Options To Improve A Sagging Neck
For patients who may need more targeted treatments yet not full surgery, Dr. Claytor often recommends minimally invasive options, which may include:
1. Submental liposuction to debulk fat and correct a “double chin” appearance
2. MyEllevate® neck lift suture system to elevate and support neck tissue
3. Precision Tx™ laser liposuction to tighten loose skin and melt residual fat (performed in conjunction with MyEllevate only)
Dr. Claytor performs these procedures using tiny entry points under local anesthesia, with most patients back to normal activities within a few days.
Gold-Standard Solution: Dr. Claytor’s Comprehensive Neck Lift
When skin excess, heavy jowls, or a pronounced turkey neck dominate, neck lift surgery remains the only “one-and-done” fix, and Dr. Brannon Claytor’s neck lift sets a high bar. During the operation, he works on the deeper anatomy, first releasing and elevating the platysma muscle (a step called platysmaplasty) before meticulously trimming excess skin.
This deep-structural approach reshapes the neck from the inside out, creating a smooth, elegant contour that looks entirely natural and lasts for years.
Dr. Claytor’s two decades of facial rejuvenation experience ensure each neck lift (often combined with a facelift) is tailored to the patient’s unique anatomy, revealing a youthful, well-defined jawline that exercises and topical treatments simply cannot achieve.
Neck treatments in Philadelphia
Skip the turkey neck exercises and schedule a personalized assessment with Dr. Brannon Claytor to explore non-surgical, minimally invasive, and surgical solutions. Call our Bryn Mawr plastic surgery center at 610-527-4833 today.
For most people, weight fluctuations are a part of life! But when it comes to investing in your appearance with a facelift, it’s useful to know how weight changes—minor and major—can affect your results.
As a highly skilled deep plane facelift expert and Philadelphia plastic surgeon, Dr. Brannon Claytor understands the nuances of facial aesthetics and what goes into the durability of a well-done facelift. Below, he delves into the relationship between weight fluctuations and facelift outcomes, and shares valuable tips to maintain your rejuvenated look for years to come.
Will weight loss affect my facelift results?
Yes, post-facelift weight loss will affect your results, and could potentially bring back some signs of aging, like fine lines and wrinkles, jowls, sunken cheeks, and wrinkles or sagging in the neck.
Here’s why: the deep plane facelift technique creates a firm foundation below the skin to lift and anchor the tissues higher on both the face and neck. But when volume is lost during weight loss, aging skin—which loses elasticity over time—may not contract as needed to maintain a firm, smooth appearance. Further, facial fat grafting is often used as part of a facelift to create youthful contours, but losing weight may shrink the carefully grafted fat.
That said, a small amount of weight loss—around 10 pounds or so—is unlikely to significantly affect a well-done deep plane facelift, as the facelift’s deeper repositioning work will not be significantly affected.
Talk with your surgeon about any weight loss or gain you anticipate in the future to decide on the right timing for your procedure. Ultimately, it’s best if you are ready to maintain a stable weight prior to undergoing a facelift for optimal outcomes.
Facelifts typically include neck lifting and tightening
While we often refer to face and neck rejuvenation as “facelift” or rhytidectomy, Dr. Claytor performs most deep plane facelifts in conjunction with open platysmaplasty of the neck—a highly durable neck rejuvenating procedure that achieves gorgeous results. Face and neck aging tend to happen concurrently, making it most patients’ goal to see an improvement in both through their surgery. For this reason, if your weight fluctuates after a facelift, your neck appearance may change, too.
How does weight gain affect a facelift?
While weight loss can “age” good facelift results, moderate weight gain is unlikely to affect how youthful you look. Still, significant weight gain stretches the skin, and if you lose weight in the future, the fluctuations will negatively affect skin’s elasticity.
How much weight change will affect my facelift results?
The impact of weight change on your facelift results depends largely on how much weight you gain or lose.
- Minor fluctuations of 5-10 pounds are generally not a cause for concern. Most patients experience small weight changes throughout the year due to holidays, stress, or lifestyle shifts, and these minor fluctuations typically won’t compromise your facelift results in any noticeable way.
- Moderate changes of 10-20 pounds can start to affect how your results look. Weight loss in this range may cause some hollowing or gauntness in the face, while weight gain can reduce the definition in your jawline and neck. The changes may be subtle but noticeable, particularly in before-and-after comparisons.
- Significant changes of 20+ pounds will likely have a visible impact on your facelift results. Substantial weight loss can lead to loose skin returning, while substantial weight gain can stretch the skin and obscure the refined contours created during surgery.
The speed of weight change also matters. Rapid weight loss or gain—like losing 30 pounds in two months—is more likely to negatively affect your results than gradual changes over a longer period. Gradual changes give your skin time to adapt.
The best approach is to reach and maintain your goal weight before having a facelift, and then commit to keeping your weight relatively stable afterward.
Reach your goal weight before a facelift
If you are planning to lose weight, make a plan for healthy, gradual weight loss before scheduling a surgery date. Aim for a weight you can maintain with sustainable lifestyle choices. You need to be within 10 pounds of your goal weight, and let some time pass for any natural skin contraction, before meeting with your plastic surgeon to develop the final surgical plan for the best possible surgical results.
Dr. R. Brannon Claytor
Dr. Claytor is board certified by the American Board of Plastic Surgery and holds over 20 years of experience as a cosmetic plastic surgeon. An innovator and teacher in the field of plastic surgery, he uses advanced techniques like the drain-free tummy tuck and deep plane facelift to streamline recovery and provide natural-looking, durable results.
Ideal candidates for rhytidectomy
Generally speaking, facelifts are best suited for patients of all ages who want to address skin laxity, wrinkles, sagging jowls or other signs of aging in the face and neck. Patients should also be in good overall health and have realistic expectations for their surgical results.
It’s important to note that facelift surgery will not erase deep wrinkles or significantly change your underlying bone structure; rather, it can help restore a more youthful contour to the face. Overall, this tends to create the appearance of “turning the clock back” by about 10 years.
If you’re considering a facelift, be sure to find an experienced board-certified plastic surgeon with whom you feel comfortable discussing your goals and expectations. Your surgeon will review your medical history as well as any medications before recommending the best course of action for you. At Claytor Noone Plastic Surgery, we understand that every patient has unique needs and concerns when it comes to facial rejuvenation; we strive to create individualized treatment plans that take these into consideration and provide optimal results.
Facelift surgery after massive weight loss or bariatric surgery
If you have undergone significant weight loss, this is a milestone to celebrate. However, it is common to be left with excess skin in the face and neck like drooping jowls, hollows under the eyes, or sagging neck skin. A facelift can help to restore the natural contours of your face and rejuvenate the neck and jowls. We suggest seeking out an experienced board-certified plastic surgeon who can discuss your goals and expectations; a well-rounded surgeon can also help you address excess body skin with a variety of lifting procedures.
About Philadelphia plastic surgeon Dr. Brannon ClaytorIf you’re ready to learn about your facelift options with a deep plane facelift expert, we’re here to help! Dr. Claytor serves patients from all over the Bryn Mawr, Main Line, & Philadelphia areas, and he is happy to talk with you about the best timing for your rejuvenation and answer all of your questions in a personal consultation. Call 610.527.4833 or contact our Philadelphia plastic surgery practice online today.
Aesthetic medicine constantly evolves, and new treatment and product innovation is essential. That’s why the expert aesthetics team at our Philadelphia plastic surgery practice is committed to advancing patient care and outcomes with the latest techniques and technologies.
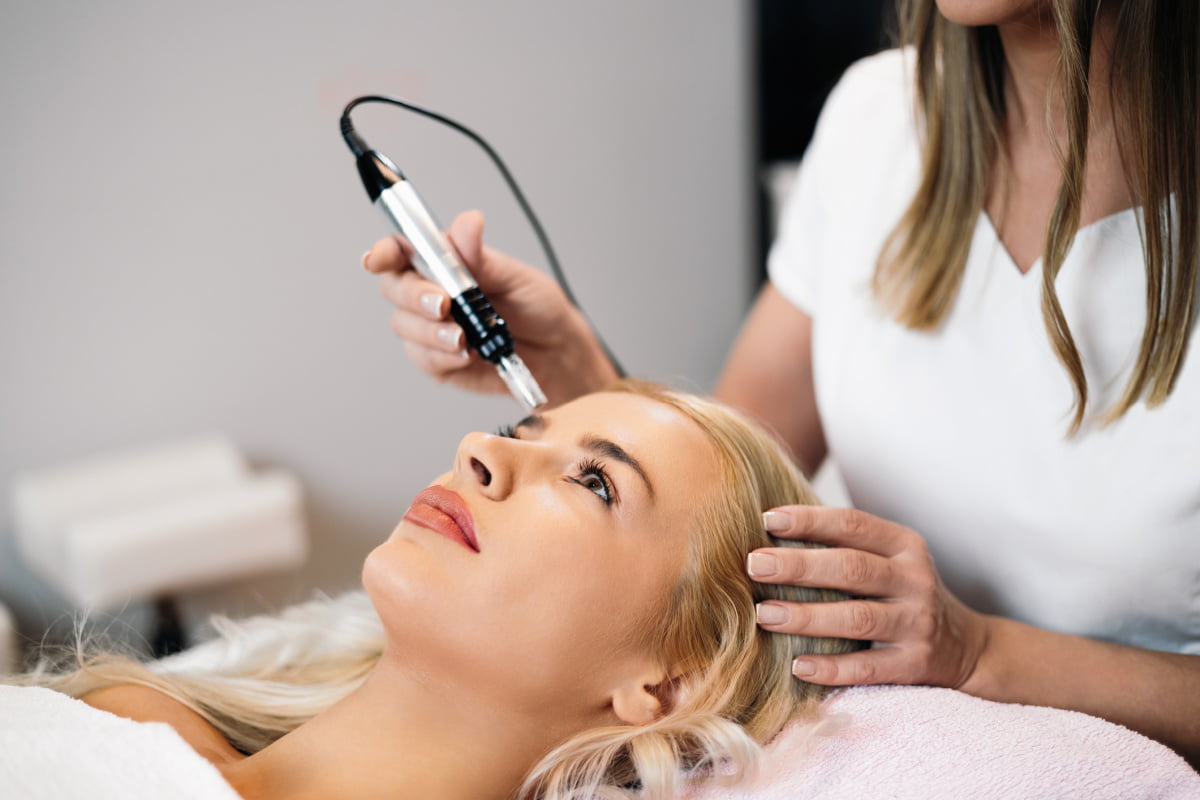
One such breakthrough we’re excited to share with our patients is Morpheus8 RF microneedling. Dr. R. Brannon Claytor has conducted award-winning microneedling research, and in this blog, he explains the differences between Morpheus8 and traditional microneedling.
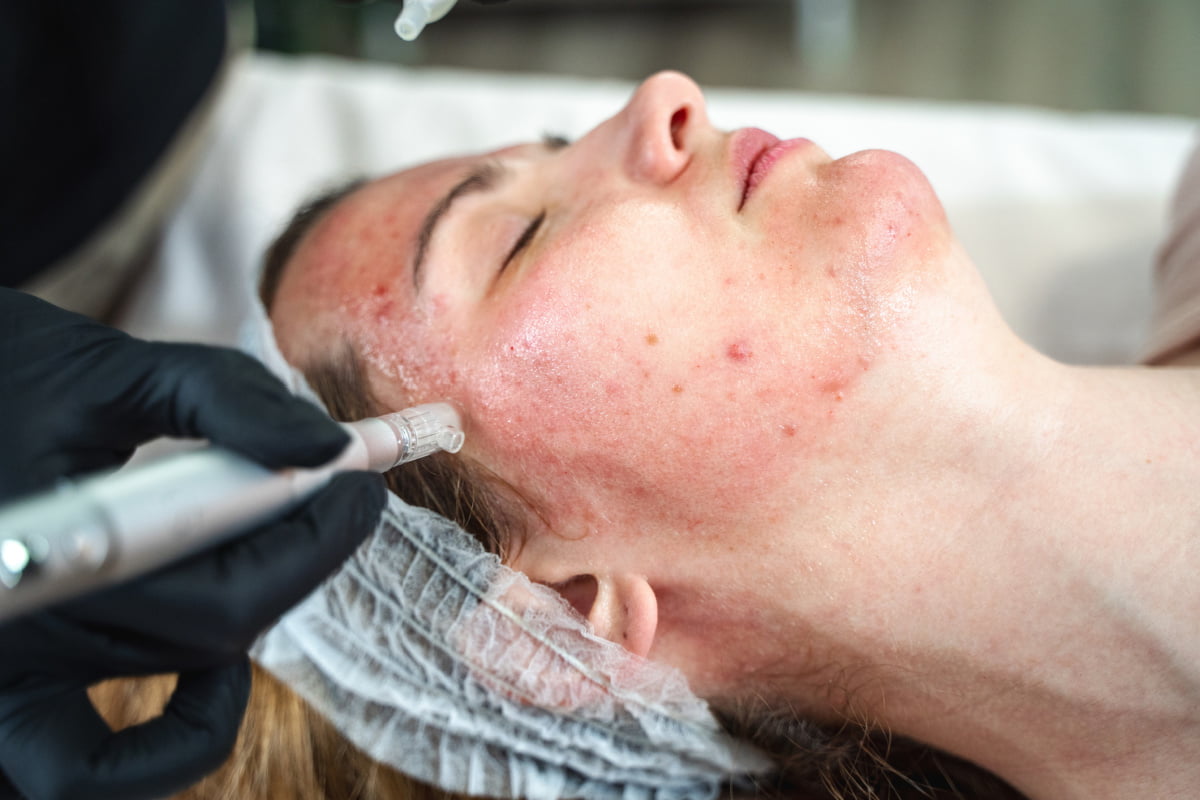
Traditional microneedling
Traditional microneedling uses a needle-tipped device to create thousands of tiny, controlled micro-injuries on the skin’s surface. These micro-injuries stimulate the body’s natural wound-healing process by boosting collagen and elastin production—two essential proteins to maintain the structure and elasticity of the skin.
As the skin heals and new collagen and elastin layers develop, the skin becomes smoother, firmer, and more youthful-looking. Traditional microneedling is widely used to address several skin concerns, including fine lines, wrinkles, scarring, mild skin laxity, and overall skin texture.
This technique is part of a novel treatment Dr. Claytor pioneered, LaMiNa (Laser + Microneedling + Nanofat), to significantly enhance facial rejuvenation outcomes. This unique treatment combination utilizes proven skin renewal methods to synergistically improve treatment results.
Morpheus8 RF microneedling
Morpheus8 is an advanced microneedling technique that integrates radiofrequency (RF) energy.
During a Morpheus8 treatment, the same micro-punctures are created as traditional microneedling, but the needles also deliver RF energy deep into the dermis. This energy heats the underlying layers of skin to create controlled damage that amplifies your body’s natural healing response. The heat from the RF energy also immediately contracts collagen fibers, which creates an immediate skin-tightening effect. Over time, the stimulated production of new collagen and elastin further improves the skin’s appearance.
Controlled RF energy enhances collagen and elastic production while tightening the skin for more comprehensive skin rejuvenation.
Key differences
Traditional microneedling and Morpheus8 RF microneedling are both highly effective in rejuvenating the skin, but there are some notable differences in their modalities and levels of results.
- Treatment depth: Morpheus8 RF microneedling penetrates deeper into the skin compared to traditional microneedling to target the underlying layers of tissue for more significant improvement in skin concerns.
- Collagen & elastin stimulation: Both methods stimulate collagen, but Morpheus8 RF microneedling typically produces quicker and more dramatic improvements because the thermal energy enhances the process.
- Versatility: Morpheus8 RF microneedling’s advanced approach also makes it preferable for treating more complex and severe skin issues, such as deep wrinkles, significant scarring, and cellulite, which would typically require a longer treatment series using traditional microneedling to achieve the same level of improvement.
- Downtime: Recovery from both procedures is generally minimal. Redness and swelling (similar to a mild sunburn) are common and short-lived with either treatment; however, there may be slightly more redness and swelling following Morpheus8 RF microneedling due to the deeper penetration and heat involved.
| Feature | Traditional Microneedling | RF Microneedling |
| Technology | Fine needles create micro-injuries | Needles + radiofrequency energy |
| Depth of penetration | Surface level (up to 2mm) | Deeper layers (up to 4mm into subdermal tissue) |
| How it works | Triggers surface-level collagen production | Combines microneedling with RF heat for deeper collagen remodeling |
| Best for | Fine lines, mild texture issues, superficial scars, tone improvement | Moderate to severe wrinkles, sagging skin, deeper scars, significant skin tightening |
| Downtime | 1-3 days of mild redness | 3-5 days of redness and swelling |
| Number of treatments | 4-6 sessions | 1-3 sessions |
| Results timeline | Gradual improvement over several months | More dramatic results, continue improving for 3-6 months |
| Pain level | Mild discomfort with topical numbing | Moderate discomfort with topical numbing |
| Cost | Lower cost per session | Higher cost per session, but fewer sessions needed |
| Skin tightening | Mild tightening from collagen production | Significant tightening from deep RF energy |
Treatment Timeline & Results
Important Note: Individual results vary significantly based on skin type, age, specific concerns being treated, and individual healing response. The following timelines represent general expectations, but your experience may differ. Dr. Claytor will provide personalized expectations during your consultation based on your unique skin condition and treatment goals.
Traditional Microneedling Timeline
- Days 1-3: Mild redness and sensitivity (similar to sunburn); typically resolves within a few days to a week
- Week 1: Skin begins to heal, minimal peeling possible
- Weeks 2-4: Initial improvements may become visible as collagen production begins
- Months 1-3: Progressive improvement in skin texture and tone continues
- Optimal results: Usually visible after multiple sessions spaced 4-6 weeks apart
Morpheus8 RF Microneedling Timeline
- Days 1-5: More pronounced redness and potential swelling due to deeper treatment depth
- Week 1: Skin healing with possible minor peeling or flaking
- Weeks 2-6: Gradual improvement becomes more apparent as collagen remodeling occurs
- Months 1-6: Continued progressive improvement and skin tightening effects
- Optimal results: Often achieved in fewer sessions (1-3) spaced 4-8 weeks apart
Both treatments show continued improvement for up to 6 months as new collagen and elastin continue to develop, but Morpheus8 typically demonstrates more dramatic and faster visible results.
Is one treatment better than the other?
Both treatments have their merits. Traditional microneedling is superb for improving skin texture issues such as scars, fine lines, and enlarged pores. Morpheus8 RF microneedling, on the other hand, is the treatment of choice for deeper skin concerns and more significant skin tightening and contouring. The best way to determine which treatment would provide optimal benefits for your skin is to schedule a consultation with a skin rejuvenation expert who is highly experienced in both treatments and thoroughly understands the skin’s anatomy and physiology.
At Claytor Noone Plastic Surgery, microneedling treatments are performed by nationally-recognized, double board-certified plastic surgeon Dr. Brannon Claytor; our Physician Assistant, Julie Holesh; and our medical esthetician. This is a tremendous advantage for patients in Bryn Mawr, Main Line, and surrounding Philadelphia areas seeking facial rejuvenation options, as many practices and medical spas employ less qualified providers to perform these med spa services.
Dr. R. Brannon Claytor
Dr. Claytor is board certified by the American Board of Plastic Surgery and holds over 20 years of experience as a cosmetic plastic surgeon. An innovator and teacher in the field of plastic surgery, he uses advanced techniques like the drain-free tummy tuck and deep plane facelift to streamline recovery and provide natural-looking, durable results.
Our priority is ensuring you receive the best outcome, and we are committed to patient satisfaction and quality of care. Our medical spa and plastic surgery practice offers the most advanced surgical and non-surgical options to enhance your natural appearance. If you are interested in Morpheus8 RF microneedling, we invite you to schedule a consultation with our experienced medical providers by calling Claytor Noone Plastic Surgery at (610) 527-4833, or filling out our contact form to receive a call from us.
Areas Served:
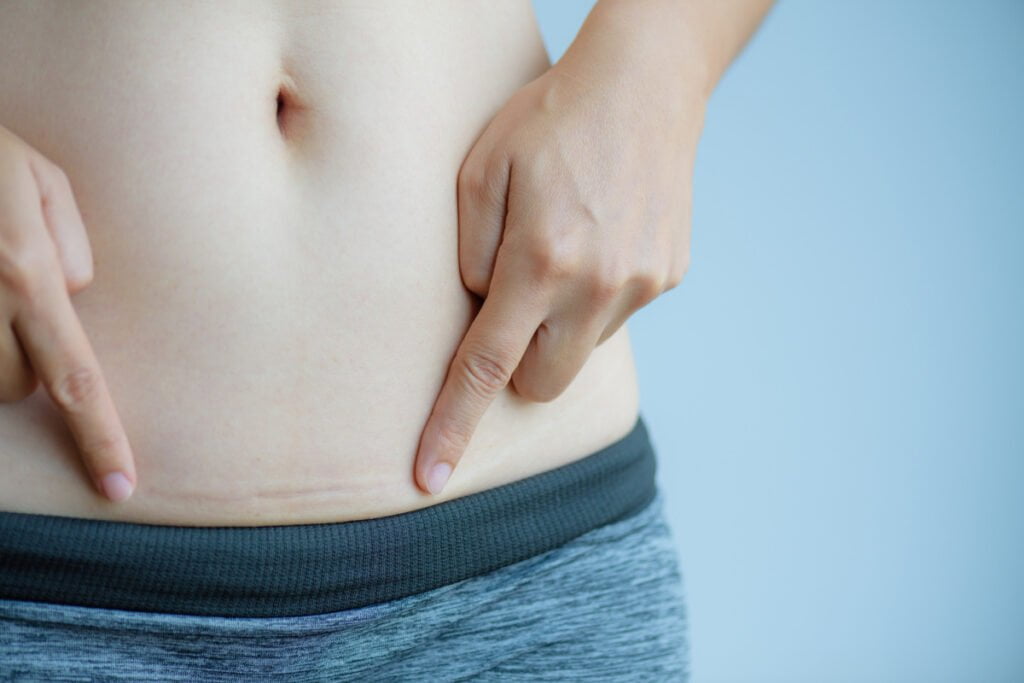
When it comes to plastic surgery, scars are a fact of life! That’s why we embrace conversations about them. Starting with your initial consultation with Philadelphia plastic surgeon Dr. Brannon Claytor, you will learn about the ways we tailor care to achieve beautiful results—and a big part of that will be where we place your incisions, plus the after-care steps we will take to help your scars heal beautifully.
Below, learn about the scar healing process and what Dr. Claytor recommends for minimizing their appearance to maximize your results.
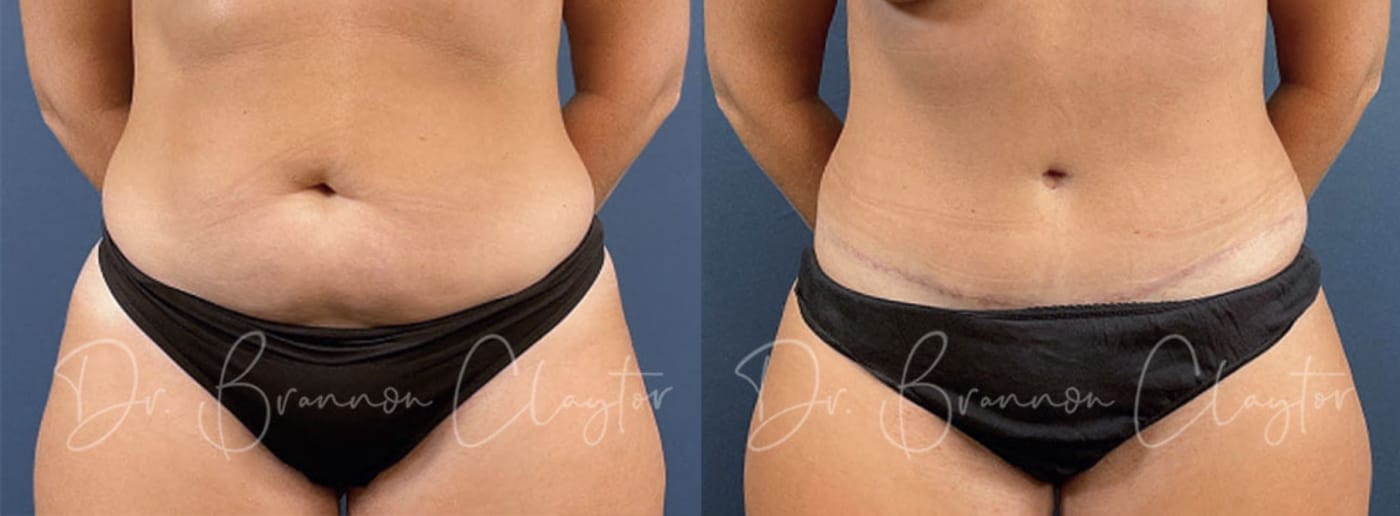
How fast do surgical scars heal?
Scars from plastic surgeries like tummy tuck or facelift continue to diminish in appearance for a full two years, but, importantly, scar tissue takes about 3 months to regain its strength. Furthermore, scars are only about halfway to their ultimate strength level at 6 weeks after surgery; this is when most patients are allowed to resume many activities and when we will likely clear you to get back to your routine, especially if you live a relatively sedentary lifestyle.
While it feels great to get back to normal life, understand that anything more than occasional light stress on your scars at this time could widen them, so, until they reach their full strength after about 3 months, it’s best to avoid any activity that might strain your healing tissues.
Scar maturation can vary based on the procedure, incision placement, and your unique anatomy, so be sure to ask your doctor specific questions you have about what you can and can’t safely do. For example, a facial procedure such as an eyelid lift will have a faster healing time and less restrictions than a body lifting procedure.
What does the scar healing timeline look like?
As stated, scar healing will vary per procedure and person, but here is a general timeline for scar healing after plastic surgery:
- Weeks 1-2: Your incisions are fresh and may look red, raised, or angry. This is completely normal. Focus on keeping the area clean, dry, and protected. Don’t apply any scar treatments yet—your priority is preventing infection and allowing the incision to close properly.
- Weeks 3-6: Once your surgeon confirms your incisions are fully closed and healed, you can start using silicone gel or sheets. Scars may still look prominent, red, or slightly raised. This is the inflammatory phase of healing, and it’s expected.
- Months 2-3: Scars typically look their worst during this period. They may appear thick, dark, or more noticeable than they did initially. Don’t panic—this is a normal part of the maturation process. Continue with sun protection and scar treatments.
- Months 3-6: You’ll start to see noticeable improvement. Scars begin to flatten, fade, and soften. Redness decreases as blood vessels in the scar tissue break down.
- Months 6-12: Scars continue to improve and fade. Most scars reach about 80% of their final appearance by the one-year mark.
- 12-18 months: Final scar maturation. Your scars should be thin, flat, and significantly lighter than the surrounding skin. Some scars may continue improving slightly beyond 18 months.
Patience is essential. Even when scars look worse before they look better, they’re going through a necessary healing process.
What’s the difference between normal and abnormal scarring?
Most scars heal normally and fade over time, but occasionally scarring can be abnormal and require additional treatment.
Normal scarring goes through predictable phases: initial redness and thickness that gradually flattens and fades to a thin, pale line. Normal scars stay within the boundaries of the original incision and improve over 12-18 months.
Hypertrophic scars are thick, raised, and red but stay within the boundaries of the original incision. They develop when the body produces excess collagen during healing. While they look more prominent than normal scars, hypertrophic scars typically improve with treatment like silicone products, steroid injections, or laser therapy.
Keloid scars are raised, thick scars that grow beyond the original incision boundaries. They can continue growing over time and may feel itchy or painful. Keloids are more common in people with darker skin tones and have a genetic component. They’re more challenging to treat than hypertrophic scars and may require steroid injections, surgical removal, or radiation therapy.
Signs of abnormal scarring:
- Scars that continue to grow beyond the incision site
- Excessive thickness or elevation that doesn’t improve after 6 months
- Persistent pain, itching, or tenderness
- Scars that seem to be getting worse rather than better over time
If you notice any of these signs, contact your surgeon. Early intervention with abnormal scarring leads to better outcomes. If you have a history of keloid or hypertrophic scarring, discuss this with your surgeon during your consultation so preventive measures can be taken.
How to help your scar heal to near invisibility
The appearance of your scars have two components: elevation and color, or pigmentation. Achieving the most beautiful results with ultra-fine, near-invisible scars requires several methods to help the scars to heal both flat and as close to your natural skin color as possible. In addition to following your plastic surgeon’s advice for physical activity limits, you can help your scars heal with a few proven methods:
Choose a surgeon who uses carefully-placed incisions
Board-certified plastic surgeons are extensively trained and experienced in surgical methods that lead to aesthetically pleasing outcomes, and scar placement is a key part of this. Plastic surgeons should place incisions in areas where the least natural tension will be placed on the healing scar, helping it to heal normally.
Incorporate a scar gel
A scar gel such as Strataderm™, which we sell in our office, or Mederma, which is available OTC at pharmacies, can be applied routinely to help minimize the appearance of scars.
Prevent hyperpigmented scars with sun protection
It’s critical to protect healing scars from sun exposure, which darkens them: pigment develops during sun exposure as the body’s reaction to protect itself from the ultraviolet (UV) rays.
Use sunscreen, hats, umbrellas, and clothing to protect healing incisions (avoid relying on sunscreen alone). In addition, you may want to consider wearing white, yellow, cream, or other light-colored bathing suits and clothing that deflect the UV light away, as dark colors like black and brown pull the light in.
Practice scar massage if instructed by your surgeon
Some plastic surgeons may recommend that certain patients practice scar massage once their scar reaches a certain point in maturity. When scar massage is called for—and each patient should ask their doctor if scar massage is appropriate for them—it can help to break up hard, raised scar tissue.
Treat early post-surgical scars with microneedling
In addition to the above measures, Dr. Claytor uses either microneedling or Morpheus8 RF microneedling to induce collagen remodeling, helping to improve scars’ appearance by making them flatter and less visible.
Previously, most surgeons believed that it was necessary to wait a full year after surgery before using microneedling to improve surgical scars’ appearance. But Dr. Claytor recently published a study in the journal Plastic And Reconstructive Surgery which found that patients who started a microneedling regimen earlier—as early as 6 weeks after surgery, once the initial healing process was complete—saw significant scar improvement at the four-month mark.
As a surgeon who is well-known for his natural-looking deep plane facelift results, Dr. Claytor is constantly working to improve methods to minimize scar appearance and promote quicker scar maturation. While scars are placed inconspicuously, scar care is still critical to achieving the finest possible scars.
Dr. Claytor’s study found that patients who started a microneedling just 6 weeks after surgery saw significant scar improvement at the four-month mark.
Scar revision surgery
In more severe cases where a scar has healed irregularly, you may decide to consult with a board-certified plastic surgeon about scar revision surgery. Revision surgery is not usually able to create a scar-free result, but a skilled surgeon may be able to improve the scar’s appearance by removing scar tissue and carefully suturing the new incision with techniques to help create a fine scar that heals to be barely perceptible. Of course, it is also key to incorporate scar care during recovery from scar revision surgery.
About Philadelphia plastic surgeon Dr. Brannon ClaytorDr. Claytor is a board-certified plastic surgeon with many years of plastic surgery experience. He has published numerous articles over his career to advance the science and artistry of aesthetic medicine, and he is committed to helping patients see their dream results safely. Dr. Claytor and the outstanding medical team at the Claytor Noone Plastic Surgery invite you to call our office at 610.527.4833 or contact us online to schedule a consultation today!
Areas Served:

Cesarean sections, commonly called C-sections, currently make up 21% of all US births. C-sections are performed for many reasons and are responsible for saving the lives of countless mothers and babies, but they require recovery time and, since they involve the same area of the body, women often wonder how long it will be before it is safe to have tummy tuck surgery to restore their pre-pregnancy body.
In this post, nationally-recognized tummy tuck specialist Dr. R. Brannon Claytor discusses how long you should wait to have a tummy tuck after your C-section, and why.
What are the benefits of getting a tummy tuck after a C-section?
Because of the incisions made to deliver a baby during a C-section, mothers are left with a large scar running either horizontally or vertically across their lower stomach after giving birth. To address this scar and other physical post-pregnancy changes, many women choose to have tummy tuck surgery, also called abdominoplasty. Following a C-section, tummy tuck surgery can:
- Lessen the C-section scar and scar tissue
- Flatten the tummy by tightening underlying muscles and removing excess fat
- Remove any excess skin and the “skin shelf” that sits above the scar
- Re-create or even enhance the pre-pregnancy figure
- Get rid of abdominal stretch marks
- Change your belly button from an ”outie” to an “innie” or otherwise improve its appearance
- Repair diastasis recti
- Contour the waist
The main reason women undergo tummy tuck surgery following their C-section, however, is to regain their sense of identity and confidence. Pregnancy takes a serious toll on a woman’s body and mind, and restoring her to her former (or enhanced) figure can help her feel more like herself again. We also often help women restore their confidence this way by including a tummy tuck as part of a full mommy makeover—a customized set of procedures, such as breast surgery, tummy tuck, and liposuction—that restores your pre-pregnancy shape.
The main reason women undergo tummy tuck surgery following their C-section, however, is to regain their sense of identity and confidence. Pregnancy takes a serious toll on a woman’s body and mind, and restoring her to her former (or enhanced) figure can help her feel more like herself again.
Can a tummy tuck fix my C-section scar?
Yes, in most cases a tummy tuck can remove or significantly improve your c-section scar. During the procedure, the incision is typically made low on the abdomen, similar to where a c-section scar sits. When excess skin is removed, your old c-section scar is often cut away entirely along with the removed tissue.
Even if your c-section scar isn’t completely removed, it’s usually repositioned lower and flatter so it can be hidden beneath underwear or a bikini bottom. The new tummy tuck scar replaces the old c-section scar, and with proper care and time, it fades to a thin line that’s much less noticeable than stretched, puckered c-section scarring.
If you have multiple c-section scars or scars in unusual positions, we’ll discuss during your consultation how they can be addressed as part of your tummy tuck procedure.
How long after a c-section can I have a tummy tuck?
For you and your baby, it’s best to wait at least six to 12 months after giving birth to have your tummy tuck. We know this can be difficult if you want to address your C-section scar, loose skin, and extra weight right away, but this waiting period allows your body to heal completely from childbirth and gives your abdominal muscles and skin time to recover as much as they naturally will.
Waiting also ensures that any postpartum weight fluctuations have stabilized. Your body goes through significant changes during pregnancy and the months following delivery, and operating too soon can compromise your results if your weight or body composition is still shifting.
Why do I need to wait to have a C-section after giving birth?
Many moms appreciate waiting for these reasons:
- Your body is healing and going through changes: You’ll need time to heal after pregnancy. Giving birth is physically, emotionally, and mentally taxing! After pregnancy, your body is coping with many postpartum transitions, such as hormonal rebalancing and breast size changes.
- Bonding is important: The first few months following childbirth are critical for mother-child bonding, and waiting for at least six months after giving birth to have your tummy tuck allows you to enjoy this time with your newborn, uninterrupted by an additional surgical recovery.
- You need time to plan: Initial recovery from a tummy tuck takes about two weeks, and you’ll want to make sure that you have time to organize, prepare, and line up the help you’ll need during that period so you can focus on healing.
- You won’t be able to lift your child during recovery: This is not the time to be lifting your child and caring for him or her on your own. If you’re tempted to do so too soon after your tummy tuck, you might accidentally strain your incisions, delay your healing process, or otherwise compromise your results.
For more suggestions on recovering from plastic surgery, we invite you to read our Mommy Makeover post.
Can I combine my tummy tuck with my C-section?
Most doctors strongly advise against combining a tummy tuck with a C-section, as your uterus is still undergoing dramatic size changes in the weeks after childbirth. Additionally, a different anesthesia type is usually used during a C-section versus a tummy tuck (this is because a C-section plan must consider childbirth safety while tummy tuck anesthesia is purely about your comfort). Lastly, your plastic surgeon will be able to recommend a more ideal tummy tuck plan when they can see how much your abdomen has “bounced back” (or not) after carrying your child. All that said, getting a tummy tuck after a C-section is perfectly safe—you just need to give yourself some time.
Will I need drains after my tummy tuck?
While it is standard for patients to require surgical drains following a tummy tuck, Dr. Claytor is nationally renowned for his drainless, or “no drain,” tummy tuck. When performed properly by a board-certified plastic surgeon, a drainless tummy tuck allows patients to recover faster and with fewer complications.
Here’s how it works: Dr. Claytor is able to maintain your Scarpa’s fascia (deep connective tissue within your abdominal wall) during surgery, which acts as a natural drainage system for your lymphatic system. This means you won’t have to deal with the hassle of emptying fluids from your drains post-surgery, and because your blood supply is improved and tissue damage is reduced, you’ll heal much faster than a traditional tummy tuck.
Is a drainless tummy tuck safe?
Traditional tummy tucks remove the lymphatic drainage from the abdomen, necessitating the use of drains. Dr. Claytor’s approach to maintaining your Scarpa’s fascia and lymphatic system is much safer and more natural. His advanced drainless tummy tuck technique has a post-surgical fluid collection rate less than that of patients who use drains, therefore his patients have a much lower rate of developing seromas. Dr. Claytor has been performing drainless tummy tucks with exceptional results for over 10 years in our Quad-A-accredited surgical suite.
Can I have more children after a tummy tuck?
Yes, you can have more children after a tummy tuck, and it’s physically safe to do so. However, pregnancy after a tummy tuck can stretch your abdominal muscles and skin again, potentially compromising your results.
If you’re planning to have more children, most surgeons strongly recommend waiting until you’re finished building your family before having a tummy tuck. This ensures you get the full benefit of the procedure without risking the need for revision surgery later.
That said, some women do choose to have a tummy tuck between pregnancies—perhaps if there’s a significant gap between children or if they’re experiencing physical discomfort from muscle separation that they want addressed sooner. Just be aware that future pregnancies may alter your results.
If you do become pregnant after a tummy tuck, your pregnancy should proceed normally. The procedure doesn’t affect your ability to carry a baby or deliver safely.
I’m ready to schedule my tummy tuck—what are my next steps?
Congratulations on your delivery! Now that you are officially recovered from your C-section, you can begin to schedule your tummy tuck procedure. Here’s what you’ll want to do:
- Make sure you’re at a stable weight and are in overall good physical condition. This will ensure you have optimal results from your tummy tuck and will help prevent any potential complications.
- Make sure you aren’t planning on becoming pregnant again. If you do get pregnant after your tummy tuck, you can still safely bear a child, but it will compromise your results. While a secondary tummy tuck can be an option, most women prefer to wait until their family is complete.
Above all else, be sure to consult with a board-certified plastic surgeon. He or she can let you know if you are a good candidate for surgery.
Dr. R. Brannon Claytor
Dr. Claytor is board certified by the American Board of Plastic Surgery and holds over 20 years of experience as a cosmetic plastic surgeon. An innovator and teacher in the field of plastic surgery, he uses advanced techniques like the drain-free tummy tuck and deep plane facelift to streamline recovery and provide natural-looking, durable results.
Tummy tuck surgery in Philadelphia
Board-certified Philadelphia plastic surgeon, Dr. R. Brannon Claytor, has been performing tummy tucks for over 20 years. Dr. Claytor specializes in the drainless tummy tuck, which reduces the need for cumbersome and unsettling abdominal tubes. Contact Dr. Claytor online or by calling (610) 527-4833 to learn how tummy tuck surgery can restore your body after a C-section and increase your confidence.
References »
The Lancet. “Caesarean section use has almost doubled globally since 2000.” ScienceDaily. ScienceDaily, 11 October 2018. <www.sciencedaily.com/releases/2018/10/181011190654.htm>.